After the Board of Directors for the SCA announced the formation of a fourth peerage--the Order of Defense, to recognize prowess on the Rapier field--a movement began for an Omnibus Peerage that would recognize prowess in the other martial activities of the society, namely Archery, Thrown Weapons, Equestrian, and Siege Weapons. A symbol was chosen, to be worn by those who support the movement: on a purple background, a golden O, plain or stylized with an accent to denote the particular activity.
I am an archer, and a leatherworker. As such, I decided to make a leather bracer with the archery O (second, in the image above). I already had on-hand all the supplies I would need, and so I set to work.

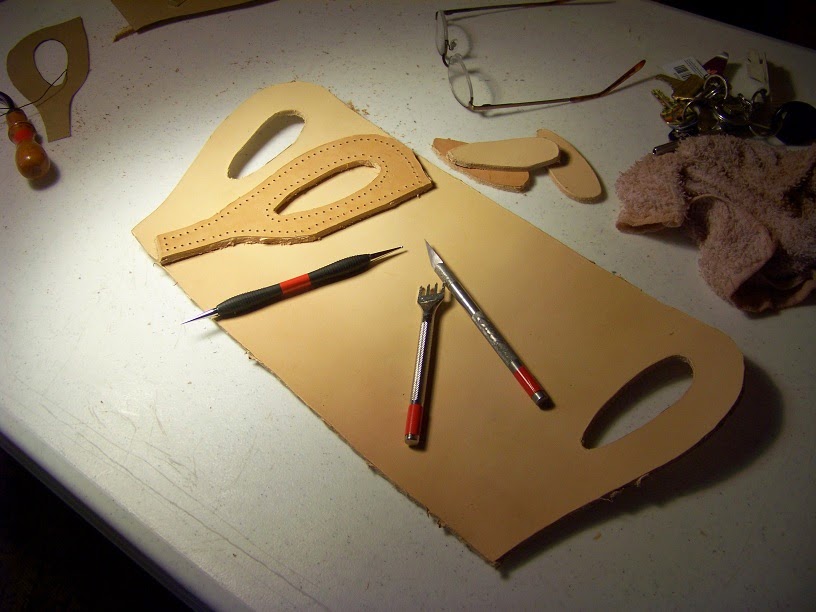
 First, I traced the outline of a bracer onto the side of leather. Then, using an Xacto knife, I cut the bracer from the side. Then I traced the outline of the O onto the leather using a ball-point stylus.
I began tooling with a flat, textured tool and a wooden mallet. I tapped down the entire interior of the O with this textured tool. Next, I used an angled tool to trace the inner border of the O, creating the raised effect. I used the same tool around the outer border of the O as well.
 When the tooling was complete, I sanded the edges of the bracer to soften the corners and eliminate the unevenness from its cutting. Then I soaked the entire bracer in water and then wrapped it around my forearm to give it its final shape. I held it in place with elastic bands and allowed it to dry completely. After it had dried, I pained the O with gold acrylic paint. I also drilled the lacing holes on each side, using a Dremel tool and the widest drill bit I have.
 Next, I placed the bracer inside my oven, set to 200 degrees. When the leather was warm, I applied hot wax to the entire face of the bracer. After it was thoroughly coated, I placed it back inside the oven to melt off the excess wax.
  This is when something went terribly, terribly wrong. The leather shrank and crumpled across the middle of the bracer, effectively ruining the piece. I was heartbroken--all that work, gone!--and at a loss for an explanation as to what went wrong and how to prevent it from happening again in the future. Fortunately my teacher and friend Lord Geoffrey had some insight to share: the oven may have been too hot, or it was possible the leather was still wet internally. Hot water causes leather to shrink and harden--it's how leather armor is made, in fact.
200 degrees is the lowest possible setting on my oven, so I was more than a little apprehensive as I put the bracer in to melt off the excess wax. I watched it like a hawk, peeking inside every thirty seconds or so to make sure it wasn't crumpling again. This time there was no mishap, and a few minutes later I pulled it out of the heat and used a cloth to wipe away a few stubborn bits of excess wax.

When the bracer cooled back down to room temperature, I threaded the cords through the lacing holes and fastened it around my forearm for the first time. What a feeling!

I have noted that, because I put the O with its top towards my wrist, it actually appears upside down when my arms hang at my sides. When I do a set of heraldic bracers (my next intended project!) I will position my arms the other way.
______________________________________________________________________
Entered In
Night on the Piazza, Barony of Lochmere, Atlantia: Open Display