Imagine my dismay, then, when I learned that upon returning home from Pennsic, he also fell ill. So did the other members of his household. So not only was I sick, but I was also Patient Zero.
Aelfgar's lady, Mistress Sigrid Briansdotter, turned this unfortunate turn of events into a fun learning opportunity. She issued me a challenge: create for her household a charm or talisman to protect them from the Evil Eye. In exchange, she said, I might ask a boon of her as well.
Well.
I had *heard* the term "Evil Eye" before, but that was literally all I knew about it. So I began to research. Many rabbit holes later, I settled on making not just one talisman, but a different one for each member of the household, inspired by their different personas.
I learned a LOT ... not just about the Evil Eye and folk cures, but also about the medieval understanding of anatomy and vision (and when you understand that, it's easy to see why they believed in things like the Evil Eye and gazing at idols). Additionally, I learned a lot about myself as an artisan--particularly that I need to practice WAY more discipline when it comes to completing projects in a timely manner. I think the boon I will ask of Sigrid will be forgiveness for the length of time she's had to wait!
For Sigrid, I made a Viking Wire Weave chain with a lunula pendant, based on a pendant found at Birka.
For Aelfgar, I made a leather flacket and bartered for three "silver" coins from three different English monarchs.
For Corun, I braided a six-strand, red, cotton cord.

Here's the documentation I sent along with the items I made:
Medieval Science and How it Relates to the Evil Eye
To understand the nearly-universal dread fascination with the power of the Evil Eye throughout medieval Europe, it helps to understand how academics of the time believed the senses operated. Medieval scholars had located the centers of sensory perception in the brain, but they believed the five senses were active entities that conveyed external stimuli to other, internal “senses”--common sense, imagination, judgement, memory, and fantasy. With regard specifically to vision, some theorized that a person’s eyes emitted rays towards a viewed object, while others believed objects emitted rays towards the eyes. In either circumstance, these rays could influence both the viewer and the object.
According to Augustine’s theory of vision, the life-fire within a person’ body--the same fire that animates and warms--is collected with unique intensity behind the eyes. For an object to be seen by a viewer, this fire must be projected in the form of a ray that is focused on the object, thereby establishing a two-way street along which the attention and energy of the viewer passes to touch its object. A representation of this object in turn returns to the eyes and is bonded to the soul and retained in the memory. This strong visual experience could be either negative (contamination by a dangerous or unsightly visual object) or positive (as in the miraculous power of an icon, when assiduously gazed upon, to heal one’s disease).
Popular beliefs and practices of the time support the conclusion that medieval people considered visual experience particularly powerful for one’s good or ill. It is easy to understand, then, why the belief in the Evil Eye persisted from classical times to the sixteenth century and beyond. It was thought of as a maleficent visual ray of potentially lethal strength. A person who had the Evil Eye could reportedly touch and poison the soul or body of an enemy.
Defenses against the Evil Eye were numerous and varied, as were cures for people already afflicted. Gestures, incantations, talismans and amulets, and even planting specific herbs and vegetables on one’s property were among the protections people practiced.
Examples of the Evil Eye Throughout the SCA Period
Belief in the power of the Evil Eye is documented even in the Bible itself. In the Book of Judges, camels are described as having “ornaments like the moon” hung around the neck for protection. Half moons have long been considered among the most potent of amulets against the Evil Eye.
Among the Greeks and Romans, statues of Nemesis were adored to save worshipers from fascination. The Romans also wore crescent moon pendants and even phallic adornments as protective amulets.
In 842 A.D., a monk of Monte Cassimo named Erchempert recorded, of a conversation with Landulf, Bishop of Capua, that the Bishop claimed whenever he met a monk’s eyes, something unlucky happened.
In England during the Black Death, it was widely believed that a glance from a sick person’s distorted eyes would communicate the infection to those on whom it fell.
In 1603, Martin Delrio, Jesuit of Louvain, published six books. In them, he writes that Maleficum existed, their powers derived of a pact with the devil, and that they infected others with evil by looking upon them with evil intent.
Persona-Inspired Remedies
Lunula (Sigrid)
Crescent-shaped Lunulae date back to Roman times, when they were worn by young girls as talismen of protecting against assorted ailments, including the Evil Eye. They have often been found in women’s graves from Birka to Russia, and are still worn in parts of the world today.
Because Sigrid is Swedish, the find from Birka caught my attention for this project. Lunula pendants were worn in particular by women of the era as talismans of fertility, female strength, and luck. It seems likely that this practice came via trade contact with the Slavic world. Pendants of this design have been found in Yugoslavia, Czechoslovakia, Poland, Hungary, Germany, Finland, Russia, and of course in Birka, Sweden. These granulated pendants were sometimes cast, while other times they were stamped. The were worn as a single pendant on a chain, or as one of many adornments on the festoons between turtle brooches.
The lunula pendant for Sigrid is a replica of a tenth century amulet, cast in bronze. It is suspended from a double-weave Viking knit chain woven of 28-gauge bronze wire.

Crescent-shaped Lunulae date back to Roman times, when they were worn by young girls as talismen of protecting against assorted ailments, including the Evil Eye. They have often been found in women’s graves from Birka to Russia, and are still worn in parts of the world today.
Because Sigrid is Swedish, the find from Birka caught my attention for this project. Lunula pendants were worn in particular by women of the era as talismans of fertility, female strength, and luck. It seems likely that this practice came via trade contact with the Slavic world. Pendants of this design have been found in Yugoslavia, Czechoslovakia, Poland, Hungary, Germany, Finland, Russia, and of course in Birka, Sweden. These granulated pendants were sometimes cast, while other times they were stamped. The were worn as a single pendant on a chain, or as one of many adornments on the festoons between turtle brooches.
The lunula pendant for Sigrid is a replica of a tenth century amulet, cast in bronze. It is suspended from a double-weave Viking knit chain woven of 28-gauge bronze wire.

Red String (Corun)
In the whole of the British Isles, the majority of Evil Eye protections and remedies seem to be of the “use what we have around the farm” variety. Onions and various bits of common animals were carried as talismans. The crescent-shaped pendants were also favored, undoubtedly a remnant of the Roman occupation. The most common remedy recorded, however, seems to have been the tying of a simple string around one’s neck. Accounts differ as to the specifics--color, ply, material, number of knots, and incantations spoken while tying the string all varied. The most frequently mentioned color is red, with green and multi-colored strings being favored as well. Where specific ply count is recorded, three-ply is what was used. The number three may have been significant to the protective and healing properties, as accounts often recorded either three knots tied in the string, or the string being wound three times around the neck of the afflicted.
These strings were commonly called sreang a chronachaidh, or snathahm cronachaidh (string or thread of hurting).
In the whole of the British Isles, the majority of Evil Eye protections and remedies seem to be of the “use what we have around the farm” variety. Onions and various bits of common animals were carried as talismans. The crescent-shaped pendants were also favored, undoubtedly a remnant of the Roman occupation. The most common remedy recorded, however, seems to have been the tying of a simple string around one’s neck. Accounts differ as to the specifics--color, ply, material, number of knots, and incantations spoken while tying the string all varied. The most frequently mentioned color is red, with green and multi-colored strings being favored as well. Where specific ply count is recorded, three-ply is what was used. The number three may have been significant to the protective and healing properties, as accounts often recorded either three knots tied in the string, or the string being wound three times around the neck of the afflicted.
These strings were commonly called sreang a chronachaidh, or snathahm cronachaidh (string or thread of hurting).
Corun’s string is a six-strand braid of red cotton. It should be worn touching the skin and, according to some accounts, tucked out of sight beneath his clothing.
Water and a Silver Coin (Aelfgar)
Also seemingly from the “use what we have around the farm” category comes a practice that appears to have been specific to Anglo-Saxon England: anointing the afflicted with fresh water that had been poured over a silver coin. Fresh water and a silver coin were frequent ingredients in other remedies of the time (a treatment for cataracts, for example, called for fresh water to be steeped with a silver coin and blades of grass). To cure an Evil Eye affliction, fresh water that has been poured over a silver coin should then be rubbed on the patient’s eyes.
 Aelfgar’s hand-struck “silver” (they’re actually pewter) coins are from the reigns of Edward the Confessor (my own personal patron saint); Harold Godwinson, the last Saxon King of England; and William the Conqueror, the first Norman King of England.
Also seemingly from the “use what we have around the farm” category comes a practice that appears to have been specific to Anglo-Saxon England: anointing the afflicted with fresh water that had been poured over a silver coin. Fresh water and a silver coin were frequent ingredients in other remedies of the time (a treatment for cataracts, for example, called for fresh water to be steeped with a silver coin and blades of grass). To cure an Evil Eye affliction, fresh water that has been poured over a silver coin should then be rubbed on the patient’s eyes.

It seemed impractical to try and send fresh water--instead, I have provided a sturdy leather vessel in which Aelfgar may collect and store water at need. This flacket is sealed inside and out with beeswax and is safe for drinking water and other cool, non-alcoholic beverages from. The stopper will prevent splash-back as the flacket is carried, but it will leak if the flask is inverted. It is secured with a cotton fingerloop braid cord in Aelfgar’s heraldic colors. The carrying strap is hand-woven cotton, also heraldically-inspired. It’s Kumihimo, which wouldn’t have been known in England during Aelfgar’s time. None of the fingerloop braids I tried made a strap in a sufficient width for this purpose, so I improvised (or cheated…) a little.


Works Cited
"Coin." British Museum. Accessed September 15, 2017. http://britishmuseum.org/research/collection_online/collection_object_details.aspx?objectId=1072750&partId=1&searchText=Edward the Confessor&images=true&page=1.
“Coin.” British Museum. Accessed September 15, 2017. http://britishmuseum.org/research/collection_online/collection_object_details.aspx?objectId=1086898&partId=1&searchText=William+the+Conqueror&images=true&page=1.
“Coin.” British Museum. Accessed September 15, 2017. http://britishmuseum.org/research/collection_online/collection_object_details.aspx?objectId=1089605&partId=1&searchText=coin+Harold&images=true&page=1.
Elworthy, Frederick Thomas. The Evil Eye: The Classic Account of an Ancient Superstition. Mineola, N.Y: Dover Publications, 2004.
Iona McCleery; A sense of the past: exploring sensory experience in the pre-modern world, Brain, Volume 132, Issue 4, 1 April 2009, Pages 1112-1117, https://doi.org/10.1093/brain/awp020
Maclagan, Robert Craig. Evil eye in the western Highlands. London: D. Nutt, 1902.
Oakseed, Trobere. "Leatherworking II." The Compleat Anachronist, no. 18 (March 1985): 38-42.
"Ornaments of Copper and Alloys, Part 2." Pycтpaнa. October 11, 2007. Accessed September 15, 2017. http://xn--80aa2bkafhg.xn--p1ai/article.php?nid=28038.
Robinson, Wayne. "Flackets - the Other Leather Bottle." The Reverend's Big Blog of Leather (blog), May 6, 2010. Accessed September 26, 2017. https://leatherworkingreverend.wordpress.com/2010/05/06/flackets-the-other-leather-bottle/.
Translation of Excerpts from
“Ornaments of Copper and Alloys, Part 2”
Привески играли роль не просто украшений, но в значительной степени амулетов-оберегов, они должны были охранять их обладателей от злых духов. К оберегам относят такие типы привесок, как зооморфные, миниатюрные предметы быта и орудия, лунницы и др. Наиболее распространенной и древней формой привесок была круглая, олицетворяющая солнце.The pendants played the role of not just decorations, but largely amulets-charms, they had to protect their owners from evil spirits. The amulets include such types of pendants as zoomorphic, miniature objects of life and tools, lunettes, etc. The most widespread and ancient form of pendants was a round, personifying the sun.
Лунницы - привески в виде полумесяца, символизирующие луну, - типичное и наиболее распространенное общеславянское украшение. Находки их известны в Югославии, Чехословакии, Польше, Венгрии, Германии, Финляндии, Швеции (Арциховский А.В., 1946. С. 88). Б.А. Рыбаков писал: «Если руководствоваться мифологией, то их (лунницы) следует считать принадлежностью девичьего убора, так как Селена - богиня Луны - была покровительницей девушек» (Рыбаков Б.А., 1971. С. 17). На Руси лунницы получили широкое распространение уже в X в. и просуществовали вплоть до середины XIV в. Специальное исследование этим украшениям посвятила В.В. Гольмстен, разработавшая их типологию и хронологию, основываясь на материалах собрания исторического музея (Гольмстен В.В., 1914. С. 90).
Lunnitsa - pendants in the form of a crescent moon, symbolizing the moon - a typical and most common Slavic adornment. Their finds are known in Yugoslavia, Czechoslovakia, Poland, Hungary, Germany, Finland, Sweden (Artsikhovsky AV, 1946. S. 88). BA Rybakov wrote: "If you follow the mythology, then their (lunnitsa) should be considered a part of the maiden's dress, since Selena - the goddess of the moon - was the patroness of the girls" (Rybakov BA, 1971. S. 17). In Russia, lunettes became widespread in the X century. and existed until the middle of the XIV century. A special study devoted to these ornaments was made by V.V. Holmsten, who developed their typology and chronology, based on the materials of the collection of the historical museum (Holmsten VV, 1914. P. 90).
Тисненые серебряные широкорогие лунницы, покрытые зернью в виде вписанных треугольников и зигзагов, окружающих выпуклые полушария, известны в древностях Великой Моравии (Декан У., 1976. С. 157). Они входили в состав украшений знати как великоморавской державы, так и Киевской Руси. Подобные привески-лунницы хорошо известны по кладам, зарытым в Х-ХI вв. (Корзухина Г.Ф., 1954. С. 88. Табл. VIII, 32, 34). Отдельные экземпляры встречаются и в богатых курганных погребениях Х-ХI вв. около крупных городов (табл. 54,3). В подражание зерненым лунницам изготовляли литые бронзовые лунницы, полностью воспроизводящие узор штампованно-зерненых изделий (табл. 54, 2). Такие лунницы встречены в курганах Х-ХI - начала ХII в. почти всех древнерусских племен, а также во многих городах.
Например, в Новгороде такая лунница найдена в слое ниже 28-го яруса, датирующегося по данным дендрохронологии 953 г. Своеобразной разновидностью широкорогих лунниц являются образцы, украшенные по концам, а иногда и в середине тремя кружочками (табл. 54, 1). Эти лунницы также имеют прототипы в великомо-равских древностях (Декап У., 1976. № 153-155), а в восточнославянских памятниках получают распространение в Х-ХI вв. В Новгороде сделана интересная находка такой лунницы в слое конца X в. вместе с ожерельем из ластовых глазчатых бусин желтого и черного цвета (Седова М.В., 1981. Рис. 6, 6). Подобные бусы датируются по многочисленным аналогиям в древнерусских памятниках X - началом XI в. Район наибольшего распространения широкорогих литых лунниц - Ленинградская, Калининская, Смоленская, Брянская области. К середине XII в. лунницы этого типа выходят из употребления.
Уже в XI в. появляется новый тип лунниц - узкогорлые, или круторогие (табл. 54, 6-8). Орнаментация их разнообразна: это и точечный подражающий зерни орнамент по контуру привески (табл. 54, 6), и глазковый орнамент (табл. 54, 8), и соединение того и другого (табл. 54, 7), и треугольники ложной зерни (табл. 54, 9). Круторогие лунницы распространены были на всей территории северной и южной Руси. Время их наибольшего распространения - ХI-ХII вв. Именно тогда создавались и такие своеобразные формы, как узкорогие язычковые (табл. 54,10) лунницы и лунницы, подражающие славянским, но изготовленные в финской среде методом литья по восковой модели (табл. 54,11).Already in the XI century. there is a new type of lunnits - narrow-necked, or steep-necked (Table 54, 6-8). Their ornamentation is diverse: it is a dot pattern imitating the grain along the contour of the pendant (Table 54, 6), and eye ornamentation (Tables 54, 8), and the combination of both (Table 54, 7), and triangles of false grain Table 54, 9). Twisting lunnits were common throughout the northern and southern Russia. The time of their greatest distribution - XI-XII centuries. It was then that such peculiar forms were created as well, such as the narrow-horned tabernacle (Table 54, 10), lunnits and lunnits imitating the Slavic, but made in the Finnish environment by casting using the wax model (Table 54, 11).
Extant Examples
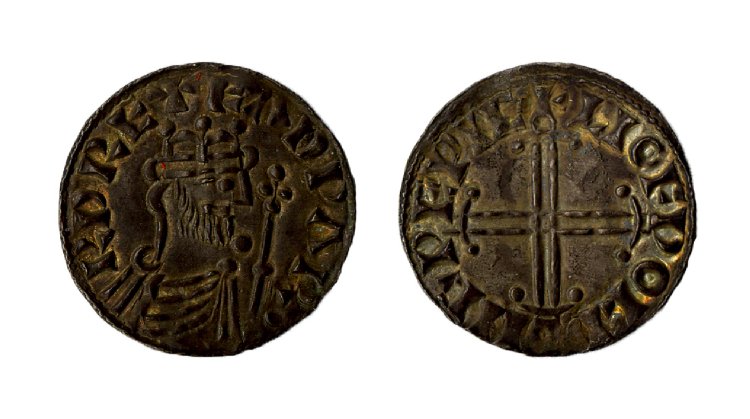
Silver Coin: Edward the Confessor. British Museum.

Silver Coin: Harold II. British Museum.
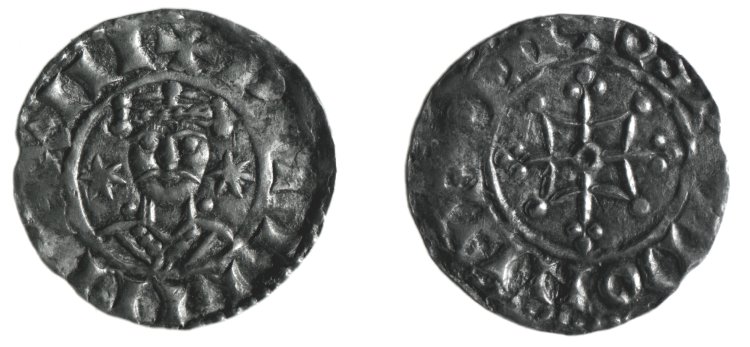
Silver Coin: William the Conqueror. British Museum.
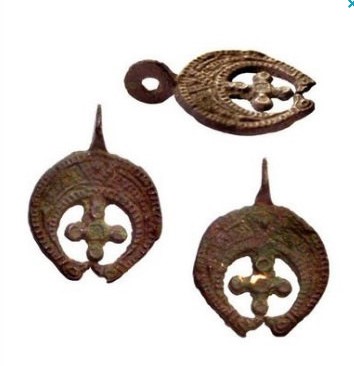
10th c. Lunula pendant.


