Tuesday, May 15, 2018

Laurel Quest: Sigrid

At Pennsic last year, there was one night early in War Week when the air quality was particularly atrocious. This, of course, brought on an attack of my chronic bronchitis. I was utterly miserable, and spent most of my last two days of war sleeping in a slouch chair. My good friend Aelfgar helped ease my suffering with assorted medications and gentle care, and I was very grateful for him.

Imagine my dismay, then, when I learned that upon returning home from Pennsic, he also fell ill. So did the other members of his household. So not only was I sick, but I was also Patient Zero.

Aelfgar's lady, Mistress Sigrid Briansdotter, turned this unfortunate turn of events into a fun learning opportunity. She issued me a challenge: create for her household a charm or talisman to protect them from the Evil Eye. In exchange, she said, I might ask a boon of her as well.

Well.

I had *heard* the term "Evil Eye" before, but that was literally all I knew about it. So I began to research. Many rabbit holes later, I settled on making not just one talisman, but a different one for each member of the household, inspired by their different personas.

I learned a LOT ... not just about the Evil Eye and folk cures, but also about the medieval understanding of anatomy and vision (and when you understand that, it's easy to see why they believed in things like the Evil Eye and gazing at idols). Additionally, I learned a lot about myself as an artisan--particularly that I need to practice WAY more discipline when it comes to completing projects in a timely manner. I think the boon I will ask of Sigrid will be forgiveness for the length of time she's had to wait!

For Sigrid, I made a Viking Wire Weave chain with a lunula pendant, based on a pendant found at Birka.

For Aelfgar, I made a leather flacket and bartered for three "silver" coins from three different English monarchs.

For Corun, I braided a six-strand, red, cotton cord.


Here's the documentation I sent along with the items I made:

Medieval Science and How it Relates to the Evil Eye

    To understand the nearly-universal dread fascination with the power of the Evil Eye throughout medieval Europe, it helps to understand how academics of the time believed the senses operated.  Medieval scholars had located the centers of sensory perception in the brain, but they believed the five senses were active entities that conveyed external stimuli to other, internal “senses”--common sense, imagination, judgement, memory, and fantasy. With regard specifically to vision, some theorized that a person’s eyes emitted rays towards a viewed object, while others believed objects emitted rays towards the eyes. In either circumstance, these rays could influence both the viewer and the object.

    According to Augustine’s theory of vision, the life-fire within a person’ body--the same fire that animates and warms--is collected with unique intensity behind the eyes. For an object to be seen by a viewer, this fire must be projected in the form of a ray that is focused on the object, thereby establishing a two-way street along which the attention and energy of the viewer passes to touch its object. A representation of this object in turn returns to the eyes and is bonded to the soul and retained in the memory. This strong visual experience could be either negative (contamination by a dangerous or unsightly visual object) or positive (as in the miraculous power of an icon, when assiduously gazed upon, to heal one’s disease).

    Popular beliefs and practices of the time support the conclusion that medieval people considered visual experience particularly powerful for one’s good or ill. It is easy to understand, then, why the belief in the Evil Eye persisted from classical times to the sixteenth century and beyond. It was thought of as a maleficent visual ray of potentially lethal strength. A person who had the Evil Eye could reportedly touch and poison the soul or body of an enemy.

    Defenses against the Evil Eye were numerous and varied, as were cures for people already afflicted. Gestures, incantations, talismans and amulets, and even planting specific herbs and vegetables on one’s property were among the protections people practiced.
Examples of the Evil Eye Throughout the SCA Period

    Belief in the power of the Evil Eye is documented even in the Bible itself. In the Book of Judges, camels are described as having “ornaments like the moon” hung around the neck for protection. Half moons have long been considered among the most potent of amulets against the Evil Eye.

    Among the Greeks and Romans, statues of Nemesis were adored to save worshipers from fascination. The Romans also wore crescent moon pendants and even phallic adornments as protective amulets.

In 842 A.D., a monk of Monte Cassimo named Erchempert recorded, of a conversation with Landulf, Bishop of Capua, that the Bishop claimed whenever he met a monk’s eyes, something unlucky happened.

    In England during the Black Death, it was widely believed that a glance from a sick person’s distorted eyes would communicate the infection to those on whom it fell.

    In 1603, Martin Delrio, Jesuit of Louvain, published six books. In them, he writes that Maleficum existed, their powers derived of a pact with the devil, and that they infected others with evil by looking upon them with evil intent.

Persona-Inspired Remedies

Lunula (Sigrid)

    Crescent-shaped Lunulae date back to Roman times, when they were worn by young girls as talismen of protecting against assorted ailments, including the Evil Eye. They have often been found in women’s graves from Birka to Russia, and are still worn in parts of the world today.

    Because Sigrid is Swedish, the find from Birka caught my attention for this project. Lunula pendants were worn in particular by women of the era as talismans of fertility, female strength, and luck. It seems likely that this practice came via trade contact with the Slavic world. Pendants of this design have been found in Yugoslavia, Czechoslovakia, Poland, Hungary, Germany, Finland, Russia, and of course in Birka, Sweden. These granulated pendants were sometimes cast, while other times they were stamped. The were worn as a single pendant on a chain, or as one of many adornments on the festoons between turtle brooches.

    The lunula pendant for Sigrid is a replica of a tenth century amulet, cast in bronze. It is suspended from a double-weave Viking knit chain woven of 28-gauge bronze wire.


Red String (Corun)

    In the whole of the British Isles, the majority of Evil Eye protections and remedies seem to be of the “use what we have around the farm” variety. Onions and various bits of common animals were carried as talismans. The crescent-shaped pendants were also favored, undoubtedly a remnant of the Roman occupation. The most common remedy recorded, however, seems to have been the tying of a simple string around one’s neck. Accounts differ as to the specifics--color, ply, material, number of knots, and incantations spoken while tying the string all varied. The most frequently mentioned color is red, with green and multi-colored strings being favored as well. Where specific ply count is recorded,  three-ply is what was used. The number three may have been significant to the protective and healing properties, as accounts often recorded either three knots tied in the string, or the string being wound three times around the neck of the afflicted.

    These strings were commonly called sreang a chronachaidh, or snathahm cronachaidh (string or thread of hurting).

    Corun’s string is a six-strand braid of red cotton. It should be worn touching the skin and, according to some accounts, tucked out of sight beneath his clothing.


Water and a Silver Coin (Aelfgar)

    Also seemingly from the “use what we have around the farm” category comes a practice that appears to have been specific to Anglo-Saxon England: anointing the afflicted with fresh water that had been poured over a silver coin. Fresh water and a silver coin were frequent ingredients in other remedies of the time (a treatment for cataracts, for example, called for fresh water to be steeped with a silver coin and blades of grass). To cure an Evil Eye affliction, fresh water that has been poured over a silver coin should then be rubbed on the patient’s eyes.

Aelfgar’s hand-struck “silver” (they’re actually pewter) coins are from the reigns of Edward the Confessor (my own personal patron saint); Harold Godwinson, the last Saxon King of England; and William the Conqueror, the first Norman King of England.

It seemed impractical to try and send fresh water--instead, I have provided a sturdy leather vessel in which Aelfgar may collect and store water at need. This flacket is sealed inside and out with beeswax and is safe for drinking water and other cool, non-alcoholic beverages from. The stopper will prevent splash-back as the flacket is carried, but it will leak if the flask is inverted. It is secured with a cotton fingerloop braid cord in Aelfgar’s heraldic colors. The carrying strap is hand-woven cotton, also heraldically-inspired. It’s Kumihimo, which wouldn’t have been known in England during Aelfgar’s time. None of the fingerloop braids I tried made a strap in a sufficient width for this purpose, so I improvised (or cheated…) a little.


Works Cited

"Coin." British Museum. Accessed September 15, 2017. http://britishmuseum.org/research/collection_online/collection_object_details.aspx?objectId=1072750&partId=1&searchText=Edward the Confessor&images=true&page=1.

“Coin.” British Museum. Accessed September 15, 2017. http://britishmuseum.org/research/collection_online/collection_object_details.aspx?objectId=1086898&partId=1&searchText=William+the+Conqueror&images=true&page=1.

“Coin.” British Museum. Accessed September 15, 2017. http://britishmuseum.org/research/collection_online/collection_object_details.aspx?objectId=1089605&partId=1&searchText=coin+Harold&images=true&page=1.

Elworthy, Frederick Thomas. The Evil Eye: The Classic Account of an Ancient Superstition. Mineola, N.Y: Dover Publications, 2004.

Iona McCleery; A sense of the past: exploring sensory experience in the pre-modern world, Brain, Volume 132, Issue 4, 1 April 2009, Pages 1112-1117, https://doi.org/10.1093/brain/awp020

Maclagan, Robert Craig. Evil eye in the western Highlands. London: D. Nutt, 1902.

Oakseed, Trobere. "Leatherworking II." The Compleat Anachronist, no. 18 (March 1985): 38-42.

"Ornaments of Copper and Alloys, Part 2." Pycтpaнa. October 11, 2007. Accessed September 15, 2017. http://xn--80aa2bkafhg.xn--p1ai/article.php?nid=28038.

Robinson, Wayne. "Flackets - the Other Leather Bottle." The Reverend's Big Blog of Leather (blog), May 6, 2010. Accessed September 26, 2017. https://leatherworkingreverend.wordpress.com/2010/05/06/flackets-the-other-leather-bottle/.

Translation of Excerpts from
“Ornaments of Copper and Alloys, Part 2”
Привески играли роль не просто украшений, но в значительной степени амулетов-оберегов, они должны были охранять их обладателей от злых духов. К оберегам относят такие типы привесок, как зооморфные, миниатюрные предметы быта и орудия, лунницы и др. Наиболее распространенной и древней формой привесок была круглая, олицетворяющая солнце.
The pendants played the role of not just decorations, but largely amulets-charms, they had to protect their owners from evil spirits. The amulets include such types of pendants as zoomorphic, miniature objects of life and tools, lunettes, etc. The most widespread and ancient form of pendants was a round, personifying the sun.
Лунницы - привески в виде полумесяца, символизирующие луну, - типичное и наиболее распространенное общеславянское украшение. Находки их известны в Югославии, Чехословакии, Польше, Венгрии, Германии, Финляндии, Швеции (Арциховский А.В., 1946. С. 88). Б.А. Рыбаков писал: «Если руководствоваться мифологией, то их (лунницы) следует считать принадлежностью девичьего убора, так как Селена - богиня Луны - была покровительницей девушек» (Рыбаков Б.А., 1971. С. 17). На Руси лунницы получили широкое распространение уже в X в. и просуществовали вплоть до середины XIV в. Специальное исследование этим украшениям посвятила В.В. Гольмстен, разработавшая их типологию и хронологию, основываясь на материалах собрания исторического музея (Гольмстен В.В., 1914. С. 90).
Lunnitsa - pendants in the form of a crescent moon, symbolizing the moon - a typical and most common Slavic adornment. Their finds are known in Yugoslavia, Czechoslovakia, Poland, Hungary, Germany, Finland, Sweden (Artsikhovsky AV, 1946. S. 88). BA Rybakov wrote: "If you follow the mythology, then their (lunnitsa) should be considered a part of the maiden's dress, since Selena - the goddess of the moon - was the patroness of the girls" (Rybakov BA, 1971. S. 17). In Russia, lunettes became widespread in the X century. and existed until the middle of the XIV century. A special study devoted to these ornaments was made by V.V. Holmsten, who developed their typology and chronology, based on the materials of the collection of the historical museum (Holmsten VV, 1914. P. 90).
Тисненые серебряные широкорогие лунницы, покрытые зернью в виде вписанных треугольников и зигзагов, окружающих выпуклые полушария, известны в древностях Великой Моравии (Декан У., 1976. С. 157). Они входили в состав украшений знати как великоморавской державы, так и Киевской Руси. Подобные привески-лунницы хорошо известны по кладам, зарытым в Х-ХI вв. (Корзухина Г.Ф., 1954. С. 88. Табл. VIII, 32, 34). Отдельные экземпляры встречаются и в богатых курганных погребениях Х-ХI вв. около крупных городов (табл. 54,3). В подражание зерненым лунницам изготовляли литые бронзовые лунницы, полностью воспроизводящие узор штампованно-зерненых изделий (табл. 54, 2). Такие лунницы встречены в курганах Х-ХI - начала ХII в. почти всех древнерусских племен, а также во многих городах.
Embossed silver wide-brimmed lunnits covered with granules in the form of inscribed triangles and zigzags surrounding the convex hemispheres are known in the antiquities of Great Moravia (Dean U., 1976. P. 157). They were part of the jewelry of the nobility as a Great Moravian state, and Kievan Rus. Such pendant lunnitsa are well known for the treasures buried in the 10th-11th centuries. (Korzukhina GF, 1954. S. 88. Table VIII, 32, 34). Individual specimens are also found in rich burial burials of the 10th-11th centuries. around large cities (Table 54.3). In imitation of grain lunnits made cast bronze lunettes, completely reproducing the pattern of stamped-grained products (Table 54, 2). Such lunnits were found in the barrows of the 10th-early 12th century. almost all ancient Russian tribes, as well as in many cities.
Например, в Новгороде такая лунница найдена в слое ниже 28-го яруса, датирующегося по данным дендрохронологии 953 г. Своеобразной разновидностью широкорогих лунниц являются образцы, украшенные по концам, а иногда и в середине тремя кружочками (табл. 54, 1). Эти лунницы также имеют прототипы в великомо-равских древностях (Декап У., 1976. № 153-155), а в восточнославянских памятниках получают распространение в Х-ХI вв. В Новгороде сделана интересная находка такой лунницы в слое конца X в. вместе с ожерельем из ластовых глазчатых бусин желтого и черного цвета (Седова М.В., 1981. Рис. 6, 6). Подобные бусы датируются по многочисленным аналогиям в древнерусских памятниках X - началом XI в. Район наибольшего распространения широкорогих литых лунниц - Ленинградская, Калининская, Смоленская, Брянская области. К середине XII в. лунницы этого типа выходят из употребления.
For example, in Novgorod such a lunette is found in a layer below the 28th tier, dated according to the dendrochronology data of 953. A specimen decorated at the ends and sometimes in the middle by three circles is a peculiar species of broad-shouldered lunnits (Table 54, 1). These lunnitses also have prototypes in the Great-European antiquities (Dekap U., 1976. № 153-155), and in the East Slavic monuments they spread in the 10th-11th centuries. In Novgorod, an interesting find of such a lunette in the late-10th century layer was made. together with a necklace of finely-colored eye beads of yellow and black color (Sedova MV, 1981. Fig. 6, 6). Such beads date back to numerous analogies in Old Russian monuments X - the beginning of the XI century. The region of the largest distribution of wide-necked cast lunnits is the Leningrad, Kalinin, Smolensk and Bryansk regions. By the middle of the XII century. lunnitsy of this type are out of use.
Уже в XI в. появляется новый тип лунниц - узкогорлые, или круторогие (табл. 54, 6-8). Орнаментация их разнообразна: это и точечный подражающий зерни орнамент по контуру привески (табл. 54, 6), и глазковый орнамент (табл. 54, 8), и соединение того и другого (табл. 54, 7), и треугольники ложной зерни (табл. 54, 9). Круторогие лунницы распространены были на всей территории северной и южной Руси. Время их наибольшего распространения - ХI-ХII вв. Именно тогда создавались и такие своеобразные формы, как узкорогие язычковые (табл. 54,10) лунницы и лунницы, подражающие славянским, но изготовленные в финской среде методом литья по восковой модели (табл. 54,11).
Already in the XI century. there is a new type of lunnits - narrow-necked, or steep-necked (Table 54, 6-8). Their ornamentation is diverse: it is a dot pattern imitating the grain along the contour of the pendant (Table 54, 6), and eye ornamentation (Tables 54, 8), and the combination of both (Table 54, 7), and triangles of false grain Table 54, 9). Twisting lunnits were common throughout the northern and southern Russia. The time of their greatest distribution - XI-XII centuries. It was then that such peculiar forms were created as well, such as the narrow-horned tabernacle (Table 54, 10), lunnits and lunnits imitating the Slavic, but made in the Finnish environment by casting using the wax model (Table 54, 11).


Extant Examples
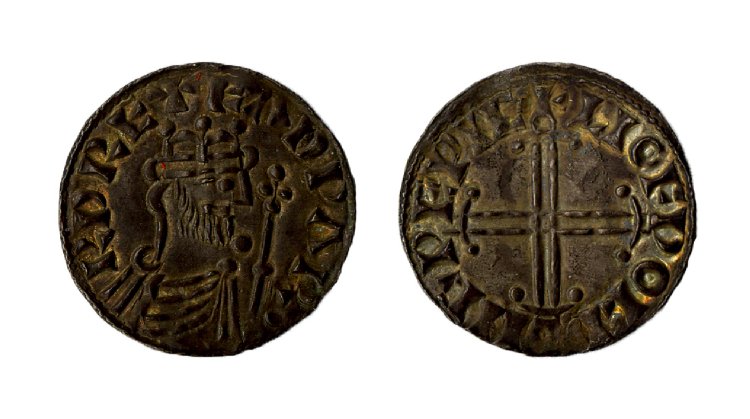
Silver Coin: Edward the Confessor. British Museum.

Silver Coin: Harold II. British Museum.
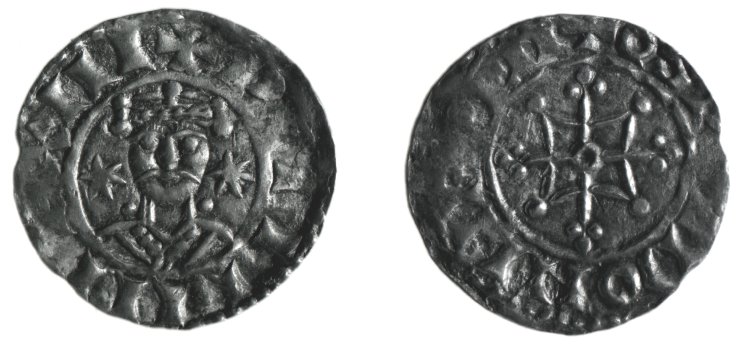
Silver Coin: William the Conqueror. British Museum.
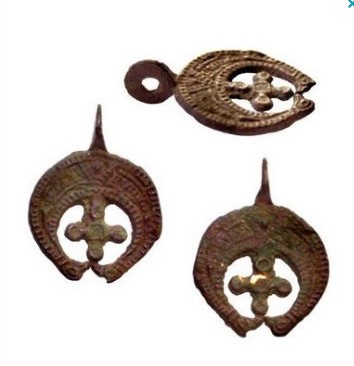
10th c. Lunula pendant.

Tuesday, July 4, 2017

Concordia Champion Prize

One of my last duties as Concordia's A&S Champion was to organize and run the competition at this year's Wars of the Roses. It is customary for the outgoing Champion to make the prize for the winner of the competition. I immediately decided to make a leather blackjack.

I began by drawing up a measured blueprint of the body of the mug on a piece of waxed parchment paper. I have discovered this to be superior to regular paper, because the wax helps it repel water when it comes time to trace the pattern onto the wet leather, thereby preventing rips and tears in the pattern. The measurements I used were based on a mug I had previously completed, which was assembled from a pattern provided by Lord Geoffrey de Cardeville during an eight-week workshop he taught in the Barony of Lochmere (Atlantia) in 2011.

Once the blueprint was drawn up, I wet down a side of ten-ounce, vegetable-tanned cow leather and traced the pattern into it. Then, using an Xacto knife, I cut the body of the blackjack from the side of leather. Since I did not intend to tool any designs into this project, I moved on immediately to the seams. Using a seam marker and a four-hole punch marker, I marked the seams into the leather. Then, using an awl, I bored the sewing holes. This is a long, miserable process, and it always makes me appreciate our modern tools all the more. When the holes were complete, I stitched the jack together using brown waxed linen thread and two needles.


Once the body of the mug was sewn, it was time to measure and cut the bottom insert. This time, I used a thinner 5-6oz. leather, which was MUCH easier to insert and sew in than the thicker leather I've used in the past. Once the bottom was sewn in, I soaked the blackjack in cool water for around five minutes. Then I carefully inserted an empty plastic bottle with the desired diameter into the mouth of the mug (one of these days I will make a proper wooden mould, but for now I use what tools I have). Once it was stretched fully around the bottle, I set it aside to dry for several days.

When it was dry, I pulled the bottle out of the mug. I then sealed the outside of the vessel with wax and the inside with a completely modern epoxy called EnvirotexLite.

 The first step in sealing the mug was to heat the leather at two hundred degrees Fahrenheit for several minutes (preheating the leather causes it to absorb the wax better) and then thoroughly coat the outside of the vessel with liquid wax. Care needed to be taken to not drip wax on the rim or inside the mug, however, as it will cause the interior sealant to not bond properly with the leather.

After the wax was applied and allowed to cool, I applied a second, thick coating of wax along the stitched seams. This prevents the interior sealant from seeping out. I used a pastry brush in both wax applications.

First coat.
Once the leather was completely cool, it was time to pour the interior sealant. For the first application, I prepared six teaspoons of the EnvirotexLite, which I poured directly into the mug. Then, by tilting it this way and that to spread the sealant, I coated the entire interior surface. Using a spoon, I carefully applied the sealant around the rim as well.

The sealant requires twenty four hours to fully set. After the first coat, the interior of the mug and the rim were very rough. I sanded it down with a fine-grit sandpaper, and then prepared a second application. It only required four teaspoons, because the leather absorbs far less on subsequent applications.

Second coat.
Twenty four hours after the second coat, the interior was much smoother. However, the interior handle seam needed some attention. This seam has proven problematic to seal in the past, because the EnvirotexLite flows with gravity, and it's really difficult to find the perfect balance that will keep the sealant in that seam until it hardens.

I created a dam with several pieces of scotch tape (a first-time experiment for this project) and, after pouring the sealant into the mug, balanced it carefully on a dolphin candle holder in my living room. I watched it for about half an hour, and it seemed to be correctly balanced. So I left it to harden and went to bed.

Whoops!
And I woke up to … well … this.

The mug tipped forward during the night, and a lot of the sealant flowed out. Fortunately, enough remained inside to sufficiently seal the seam. Fortunately as well, it didn't stick to the surface of my bookcase, nor to the waxed top of the mug handle! I was able to cut off the solidified overflow and easily remove the tape dam.

 I applied one final, small coat of the sealant, mostly to smooth over a few rough edges. When that last coat was set, I again placed the mug inside my oven at 200 degrees to melt off the excess wax from the surface and exterior seams. Then, while the leather was still warm, I used a soft cloth to buff the waxed surfaces.

When the mug again cooled, I filled it with water and let it sit for an hour to test for watertightness. It passed the test, showing no signs of seepage or leaks. This mug will hold twelve ounces of hot or cold liquid.


I displayed it in the open display at Roses. Then it was awarded to Lady Astrid, who won the Populace Choice competition with her lovely embroidery!

Monday, May 29, 2017

Champion Challenge

When Their Excellencies Concordia selected me as their A&S Champion, I set a number of goals for my tenure in that role. I wanted to continue to grow and learn as an artisan. I wanted to inspire and encourage other artisans. And I wanted to build a network with my fellow artisans--people I could talk to, people who shared my interests or inspired me to try something new.

One of the ways I decided to go about accomplishing all that was to visit A&S displays and interact with the artisans showing their work. I set myself a high goal--500 displays and performances. I had special cards made to leave with tokens at these displays.


My first chance to begin working on this goal came at Pennsic XLV. On Sunday of War Week, I visited the Pennsic A&S Display where artisans from across the Knowne Worlde showed their work. There is SO much talent and knowledge in the SCA--it's really an amazing thing to behold. I've always been impressed with the work of our artisans and enjoyed looking at their displays. This time, though, I noticed a distinct difference: I wasn't just an observer. I was able to engage in intelligent, knowledgeable discourse with so many different people about techniques, materials and research.  I set out to appreciate and encourage others; I wound up inspiring myself all over again.

A handful of the displays at Pennsic, showing a variety of skills and crafts.


There were a few artisans with whom I spent a large amount of time "talking shop"--in particular, two different leather workers and one Viking chain weaver. The was also one artisan from the West--a truly lovely lady who had pottery on display--who was so delighted with the small token I left that she gave me a piece of her pottery in return!

I learned a lot from Brendan about
period leather dying techniques!
This Laurel diadem is gilded leather.
It was so amazingly light and thin!


I also attended the Knowne World Choir and Friends concert on Thursday of War Week, and presented the director of each group with a card and token as well. There really is nothing that compares with live music--it flows into you and through you and moves you in ways that a recording simply never can.

In September, I traveled to South Dakota for the coronation of the SCA's first same-gendered monarchs, Yehudah & Hrodir. There I got to experience a "Sweet and Sour Tastery and Temptorium" as well as enjoy a phenomenal display of the artisans of the Kingdom of Northshield.  There were gorgeous gowns, stunning embroidery, intricately knotted hair nets, delicate ceramics, beautiful woven trim, and of course, Posaments, which I was particularly excited to see again since I took Eithni's class at Pennsic. I was hoping for the chance to geek out with her over my first attempts, but alas I never ran into her at the event.

Posaments on display at the Coronation of Yehudah and Hrodir.

In February, I attended King and Queen's A&S and Bardic Championships in the East Kingdom, where I had the opportunity to speak at length with many artisans about their entries.  I learned about kilns and beads and Italian coats and Tudor toothpaste. I saw how vibrant colors could be achieved with period dyes, disabusing my previously held notion that medieval garments were often pale or faded. I tasted food that had been preserved with salt distilled from the sea. I chatted about how historical events led to the differences in modern Christian denominations. I learned that enamel comes out different depending on what fuel you use to heat it. All of the artisans were SO knowledgeable about their topics, and so very willing to share that knowledge! It really touched me, too, how many of them appreciated my small tokens--one artisan immediately plucked the ring from the card and put it on his finger; another emailed me right after the event to tell me how he had enjoyed speaking with me and thanking me for my support. It was very humbling.

And after I visited the artisans, I had the immense pleasure of listening to the final round of the Bardic competition. A challenge was issued to for performers: they were to prepare a performance (based on their resume) on a theme selected by Their Majesties. They had only thirty minutes from the time they learned their them until the time they performed--I can't even imagine that kind of pressure! All four of them were *amazing*.

A middle eastern umbrella that remains
 parallel to the ground,
regardless of the angle of the stick holding it!
In March, I traveled to the Barony of Nottinghill Coill in Atlantia to attend the Kingdom A&S Festival. I set up my own display, and then spent a considerable amount of time being amazed by the talent and knowledge of others. From hand-embroidered Elizabethan garments (WHERE do they find the patience for that?!) to a period umbrella that may make retainers' lives a whole lot easier to delicious baked treats, the displays were inspiring.

I was especially happy to see Lord Ihone's leatherwork display -- in particular, I noted that he had done a leather "scroll", which is an idea I have tossed around for my protege sister for *years* but wasn't sure how to tackle. I didn't get a chance to chat with him, sadly, but I was delighted when he was named as Atlantia's new A&S Champion!

Ihone's leatherwork display.
In April, I attended Night of the Tartan in the Barony of Lochmere in Atlantia. There were several A&S competitions, an open display, and a competition to select the official Baronial Beverage (which drew twelve entries!). One of the competitions had a Celtic knotwork theme, and the other was a "new-to-you" theme. There were scrolls and trim, and a wooden Viking chair and a hat and a poncho. I also had the pleasure of listening to Laydes Fayre and the Lochmere Vocal Music Guild perform several period pieces.

May brought me full-circle back to Wars of the Roses, where I was in charge of running the competition to choose my successor. The challenge was to create an item that would have been owned or used by any of the "major players" throughout the Wars of the Roses. We had five entrants in the competition, exhibiting excellent craftsmanship. I was personally drawn to Lord John Kelton's leather costrel--I am so excited to know there's another leatherworker in the local group!


Lord John's leather costrel -- winner of the Baronial Champion competition.
Lady Astrid's display -- winner of the Populace Choice competition.
Roses also had close to a dozen entries in the Brewing competition. While I wasn't able to indulge in the taste-testing (I had to drive), I was inspired by the entries and have found new motivation to take the plunge into brewing myself -- a project I have long wanted to tackle but keep putting off for various reasons. No more! Perhaps next year, a bottle of my brew will stand beside the other entrants at Roses?

Turning in my sash and medallion at evening court was bittersweet. I am honored and humbled to have represented Their Excellencies for the past year, and I am eternally grateful both for the faith They placed in me and the opportunity They offered me. I am inspired to strive onward in my arts, to continue learning and growing. I will also carry with me all that I have learned over the course of this quest I set for myself--both the increased knowledge I gained about various arts, and a new approach and purpose as I visit displays and interact with other artisans in the future.

Wednesday, March 8, 2017

A New Wire Project: Roman/Greek Fibulae

I've been looking for ways to expand the collection of period items I can make, using the materials and tools I have on hand. Anything made of wire, therefore, has been an obvious choice for experimentation. I was browsing around Pinterest and came across an Instructibles tutorial for Roman Fibulae, and it caught my attention. They seemed really simple to make, and I thought they'd be a nice alternative to wire-wrap wrings for largesse and tokens at A&S displays.

The directions call for 16-gauge wire. The closest I had on hand was 18-gauge, silver-plated wire, so I used that. I opted for only four loops instead of five, and I couldn't do the hammering part because my husband was asleep just down the hall (oh, how wonderful it will be to finally move into our house, where I will have a workshop!).

Forming the "catch".

When I finished my first attempt, I had about two inches of wire leftover. Therefore, I cut only a nine inch length for my second attempt. My loops were much closer together on the second fibula, so I *still* wound up with about an inch of excess wire, even though I increased from four loops to five.

First (top) and second fibulae complete.

I still need to file the tips of the pins into points, so that they can piece fabric to be worn.

After I make a handful more of these simple fibula, I want to begin experiments to recreate some (pre-)period extant pieces:

800 B.C. Northern Greece. Harvard Art Museum.


800 B.C. Central Europe.

500 B.C. Halstatt, Austria.


300 B.C. Roman.

Monday, March 6, 2017

Atlantia KASF 2017


In years past, I have displayed at Atlantia's KASF as part of a group--the first time with my household, and the second time with the Barony of Lochmere. This year, I displayed by myself, as the A&S Champion for the Barony of Concordia of the Snows. Because I'm a champion of the East and not Atlantia, I did not participate in the Inter-Baronial Champions' Competition. Rather, I entered the open display. I received some delightful feedback about my work, particularly from the Baron of Nottinghill Coill (who was also astounded when he learned I had traveled from upstate NY to attend the event!).

Documentation text:

Comparing Copper and Silver as Used in Viking Wire Weave

A few years ago at Pennsic, an old friend sat down with me beneath our baronial pavilion and taught me to make Viking Wire Weave chains (sometimes also called Viking Knit or Trichinopoly). I took to it almost immediately, and began entering pieces in A&S competitions and displays shortly thereafter.

In one such competition at the Feast for St. Brigit in the Barony of Lochmere, I entered two necklaces. These were woven of what had become my go-to material: 26-gauge, dead soft, enameled copper wire. I like that it was inexpensive but still easy to work with – less prone to kinks and tangles than cheaper options at my local Michael's. I also like the array of color options available, because I could achieve a period look (most extant examples are woven of silver wire) or a less-period, heraldic chain, as desired.

Copper was a solid and reasonable substitute for silver, with valid reasons for its selection. On a molecular level, copper is very similar to silver and behaves in much the same way when worked. Additionally, as stated above, it was available in a silver-colored enamel. And, of course, it was far less expensive than actual silver wire.

In her judge's feedback that day, Mistress Mary Isabel of Heatherstone suggested I try working in real silver, even if only once, so that I could gain a deeper understanding of how it differs from copper by actually feeling it as I work, rather than just reading about the differences.

It has taken me two years to work up the courage, make the investment, and take that plunge. I have to admit that I was skeptical before I started. How different could it actually be, anyway? By this point, I had worked with copper in gauges ranging from 20 to 28 and in tempers from dead soft to half hard. I expected this experiment to demonstrate only which temper produced a similar feel, and perhaps to reveal a slight difference in the silver color of the chains.

Boy, was I in for a surprise.

For the purposes of this experiment, I selected 28-gauge, dead soft wire in enameled copper and sterling silver. I used the same mandrel, and wove identical chains of six-loop, double-weave knit. I began with the copper chain.

From the moment I began to weave with the silver, I could feel a difference. Though it was the same gauge as the copper, it felt more substantial in my fingers. More stable, perhaps. It was certainly less prone to kinking as I worked with it. It was somehow smoother, too. It made me think of satin. I was somewhat confounded as I continued to work. How could something be sturdier and softer, at the same time?

Unlike with the enameled copper, I didn't have to worry about friction with the silver as I wove. With the copper, there's a risk that the scraping will damage the enamel finish, causing the color to flake off.

Containing the loose ends of each piece of wire seemed easier with the silver as well. In running my hands along the woven chain, there are noticeably fewer “poky bits” protruding from the silver than from the copper (You are welcome to try that on these pieces, but please slide your fingers lightly and slowly! I wouldn't want you to injure yourself).

For this display, I left the chains incomplete (when finished, they will be necklaces). I drew them through a wooden drawplate for about half of their length, so that I would have examples of the chains both drawn and undrawn.

The finished pieces are all enameled copper, displayed to show the variety of weaves and designs possible with Viking Wire Weave.


I look forward to working more in silver (as finances allow) in the future – it was a true pleasure to work with!

Thursday, January 26, 2017

Wire Wrap Ring Tutorial

Wire wrap rings are not (as far as I have been able to determine) actually Period. However, they have a reasonably period look, and are quick and easy to make.

Tools/Materials:

Wire (I use 20-gauge copper wire from Unkamen Supplies on Etsy)
Beads (the beads in this tutorial are 7.4mm plastic pearl beads)
Mandrel
Wire Snips
Pliers

Process:

1. Cut desired length of wire. This takes some trial and error, to determine what length you prefer for the look you are trying to achieve. Longer wire can wrap more times around the bead. Tip! Err on the side of too long at first. You can always snip off the excess.

2. Thread the bead onto the wire, and bend the wire in half so that the bead is at the center.


3. Wrap the loose ends of the wire in opposite directions around your mandrel (I use a ring-sizing stick now, but in the past I've used everything from a broom stick to a Tide-to-Go pen). Wrap all the way around, back to the bead on each side. While holding the bead in place, tug gently on the loose ends to ensure the wire is wrapped snugly around the mandrel.

4. Wrap the wire around the perimeter of the bead at least once (I usually circle the bead two or three times), to encircle it. Make sure to leave at least an inch of wire on each end.

5. Take the ring off the mandrel. Wrap the ends around the band of the ring until you run out of length. Use the pliers to crimp down the end tightly against the band--you don't want pokey bits stabbing somebody's fingers when they wear your ring! The band will shift around a bit as you do this. Try to minimize it, but don't worry overmuch. We'll correct it in the next step.

6. Place the ring back around the mandrel. Work it with your fingers (and the pliers, if needed) to achieve the circular band and the desired look around the bead. As you gain experience making the rings, this is where your creativity can really come into play (see finished examples, below).


7. Take the ring back off the mandrel. Et voila! Your ring is complete!

Basic ring.


Oval bead.

Fancy wire wrap.

Wednesday, January 11, 2017

Nobelese Largesse Swap 11: Kingdom/Household Pride

The theme for Nobelese Largesse Swap #11 is Kingdom/Household Pride. It's actually a theme I suggested--I figured we could all learn a little about someone else's kingdom while we were at it! My recipient is Lady Izza bint Amat al-Rahman, who lives in the Shire of Arenal in Meridies.

Meridies is crazy. That was my first impression, anyway, as I began browsing around the kingdom website. Did you know they have FOUR populace badges?! Four! So, I had to find out a bit more about these badges if I intended to incorporate them into my project.


Other items I considered incorporating into my project were Meridies' kingdom arms, the arms of the Shire of Arenal, and Izza's own arms. Putting all of these things onto a single item would be WAY too busy, so I decided to pare it down to the Kingdom badge (but ...which one?!) and a single set of the wings from Arenal's arms. I planned to do a limp-bound book (hooray for new skills!), with the kingdom badge on the front and the wings on the back.

I tried to find out about the Meridies badges on my own. Google didn't reveal anything, though. Then I tried asking in various groups on Facebook, still to no avail. Finally, I had to ask my recipient (via the swap coordiantors) which badge she preferred to use, since as best as I could figure they're all interchangeable.

The answer came back: Izza prefers the third option above. Great! The leather I had chosen for the project was white already, so it should be easy to tool and paint the black bar and the three stars on the front, and the blue wings on the back.

I've only ever done plain books before, so I wasn't sure exactly how to place the designs to be centered on the covers. I figured, though, that I could just bind up the book and *then* tool the decorations, because I could open it to lay the covers flat on the marble slat for tooling.

The binding went well: I did five folios of ten pages each, for a hundred-page book (5 folios x 10 sheets = 50, front-and-back = 100 pages). After folding the flap over and securing it with a white leather cord (photo, right), I worried that the Meridies badge would look really squished in the visible front cover space. But then I realized that the flap itself could be one third of the badge design! This made me really happy.

That happiness was short-lived.

I don't know if it was the dying process or the tanning process (or both) for this particular leather, but it did not take to tooling AT ALL. And then the paint wouldn't adhere to the surface, either. And in the process of fighting with it, several of the pages got stained. All in all, it was a catastrophic failure--completely unsalvageable.

I was not at all eager to jump into anything else even remotely experimental at this point--the deadline loomed, the holidays were upon me, AND we were in the late stages of buying our first house. So I opted for a tried-and-true item: a Viking chain necklace. They are from the correct time period for Izza's persona, and I was 100% confident I would not experience any project failures--catastrophic or otherwise!

Actually, I made two necklaces. Both necklaces are woven from 26 gauge enameled copper wire (I sure do love that wire!), with five starting petals. I used a trusty Sharpie marker as my mandrel.

The first one I made was not entirely period--it's my own created design of single-weave in one color over double-weave of another color. In this case, it was single black and double silver -- Meridies colors. The inner core and outer layer are woven concurrently and drawn together.

Single black over double silver in progress.
Then, because this is not technically a period design, I also made a standard Viking double-weave chain in just silver.

Silver double-weave, before drawing.

They went in the mail today, and should be delivered on Friday. I hope Izza likes them!