Several years ago, a new family moved to the Barony of Lochmere. The
head of the household, Lord Geoffrey de Cardeville, happened to be a
master leatherworker. He offered a series of classes to the Barony, and I
was one of several who took advantage of the opportunity.
Lord Geoffrey's specialty is the Black Jack, and it was this project
that he offered for his series of classes. We worked each Sunday as a
group with Geoff leading us step-by-step through most of the
construction, but we did complete some of the tooling and sewing on our
own at home.
First, we chose which shape we wanted for our Black Jack from among the
patterns Geoff has developed over the years. I chose a larger, more
"manly" pattern for a mug that would stand up straight (he also had
patterns for smaller mugs, and for mugs that lean back slightly). After
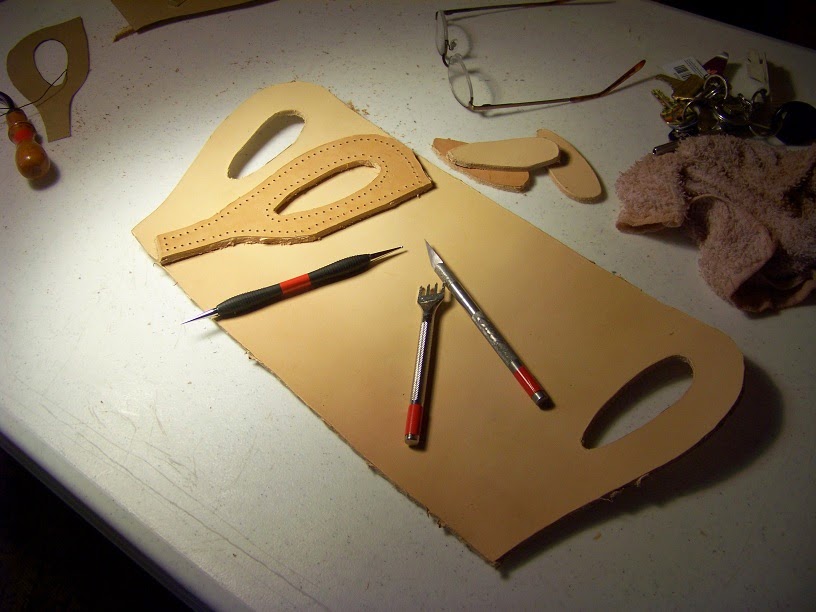
tracing the pattern onto the side of leather, I cut it out using an
Xaxto knife--this is a somewhat tedious, labor-intensive step.
With the pattern selected and the leather cut, I knew what my surface
area was for tooling the design. My homework after the first Sunday was
to decide what I wanted to tool. I chose a variation my SCA device (
Azure, a dog's head couped contourny between three mullets and on a chief argent three shamrocks vert
-- in this rendering, the dog's head is not contourny). For the
background, I created a pattern of two of the major elements of my
device: white stars and green shamrocks. I decided that the stars would
be "pushed in" while the shamrocks would be "raised."
The following Sunday, the holes for the stitching were drilled into the
leather. This was accomplished using a Dremel tool--SO much easier and
faster than trying to do the holes by hand with an awl! After the holes
were drilled, I traced my design onto the leather.
Then the tooling began. I accomplished the majority of it while I was
working the overnight shift at the airport--I was able to work
relatively undisturbed for several hours at a stretch, and the project
helped keep me awake on those long, winter nights!
The following Sunday, construction began. Under Geoff's careful
tutelage, I began to stitch my Black Jack together using waxed linen
thread and two tapestry needles. This is a slow, painful process and is,
by far, my least favorite part of any leatherwork project. I break
countless needles each time I have to sew something, and it makes my
fingers ache fiercely. It's worth the pain and suffering, though.
First, the handles were stitched together, along with an extra insert of
leather to give extra strength and rigidness to the handle. Then the
bottom of the mug was soaked in water and fitted in, and then that was
stitched into place as well with a double row of stitches. Surprisingly,
the bottom was much easier to stitch than the handle! It led me to
wonder if this was because the leather was wet, and I have made a mental
note to experiment with soaking the handle prior to sewing it in future
projects.
When the stitching was complete, the entire piece was thoroughly soaked
in water. After that, I poured sand into the Jack until it was
completely filled. Then, using a dowel rod, I packed the sand down into
the mug. This stretched the leather and gave the piece its final shape.
When the desired shape was achieved, the Black Jack was set aside to dry
for many days.
When the leather was completely dry, the sand was poured out and it was
time to paint the design. Geoff had us use acrylic paint for this step
of the project, which is not a period paint. However, it is durable,
sticks well on the leather, and offers a range of bright, vibrant
colors.
Once the paint was dry, it was time to coat the exterior with beeswax.
Geoff used a crock pot to liquefy the wax. While it was melting, he
heated his oven and we placed the Black Jack inside, warming the
leather. This made it more absorbent of the wax, which we applied
generously to the outside of the mug using a pastry brush. Extra wax was
applied to the stitches, to prevent the sealant that would be poured
inside the mug from seeping out.
When the wax had hardened, it was time to pour the sealant. While in
period they would have used pitch or wax, we used a modern poly-resin
mixture called Envirotex Lite. There were three separate pourings of
this sealant, which was allowed to dry completely (taking a minimum of
twenty four hours) and was then sanded between the first-and-second and
the second-and-third pouring. Once the third coat was completely dry, we
put the Black Jack into a heated oven again to evenly melt off the
excess wax, and VOILA! The project was complete!


No comments:
Post a Comment