Sunday, April 24, 2016

A&S 50 Challenge

This year is A.S. L, also known as the fiftieth year of the Society for Creative Anachronism. In celebration of this momentous occasion, a challenge was put forth to artisans across the Knowne Worlde. An artisan could choose to make one item from each of fifty different crafts, or to make fifty items of one single craft. This feat was to be accomplished before the fifty-year celebration, which will be held in June 2016.

I opted for the latter challenge: fifty items of one craft. The craft I chose was Viking Wire Weave. It has taken me a year and a half to complete this challenge. Herein are my fifty items. All are woven of 26-gauge enameled copper wire, unless otherwise specified.

Item #1: A copper, six-loop, single-weave necklace, which I entered in a winner-takes-all competition at Lochmere's Battle on the Bay event in September 2014.

Item #2: A silver, six-loop, double-weave necklace, which I entered in a competition at Lochmere's Battle on the Bay event in September 2014. I won this competition.

Item #3: A silver, seven-loop, single-weave necklace, which I made as a token of my favor for my fiance, Luke.

#4, in progress
Item #4: A double-stranded necklace of blue and green, six-loop, single-weave, which I made for my protege-sister Isolde.

Item #5: A chain of alternating blocks of green, silver, and blue, to be worn suspended between the brooches of my Viking apron dress.

#7 & #8
Item #6: A double-stranded chain of blue and silver, to be worn suspended between the brooches of my Viking apron dress.

Item #7: A silver circlet. This chain was actually a mess-up that I drew too tightly, causing the weave to become deformed. It also featured my first hand-made hook clasp, however, and I was darn proud of how that came out.

Item #8: A green, six-loop, double-weave necklace to be worn by me.

Item #9: A silver, six-loop, single-weave necklace for my Opal medallion.

Item #10: A blue, six-loop, double-weave necklace given to the Barony of Lochmere as largesse.

Item #11: A chain of alternating blocks of single-strand, double-weave silver and double-strand, single-weave gold-and-blue. Experimental. Added to stockpile of largesse.

#12 - #20: Avacal Largess
Items #12 - #20: An assortment of red, gold, and silver chains, made to contribute to the Principality of Oertha's largesse basket for the new Kingdom of Avacal.

#21
Item #21: A new technique: six-loop, single-weave green over six-loop, double-weave silver. Intended to be a bracelet, but a bit too long. I wear it as an anklet instead.

Item #22: Six-loop, single-weave red over six-loop, double-weave gold. Necklace. I'm not actually sure where this one ended up!

Item #23: Six-loop, single-weave blue over six-loop, double-weave silver. Added to stockpile of largesse.

Item #24: Six-loop, double-weave red necklace. Added to stockpile of largesse.

Item #25: Six-loop, triple weave gold necklace with blue glass pendant. Christmas gift for my aunt.

Item #27: Six-loop, double-weave blue necklace. Auctioned at the fundraiser for Lochmere's new coronets.

Item #28: Six-loop, triple-weave green necklace. Entered in an A&S competition at Lochmere's Feast of St. Brigit, with item 29. Won the competition.

Item #29: Six-loop, double-weave copper necklace. Entered in an A&S competition at Lochmere's Feast of St. Brigit, with item 28. Won the competition. Later given as prize for A&S competition at Lochmere's Battle on the Bay 2015.

#28 and #29. Photo (c) Lady Cassair Warwick


Item #30: Six-loop, double-weave blue and silver necklace. Site token for the Queen of Atlantia at Lochmere's Feast of St. Brigit.

Item #31: Six-loop, double-weave blue and silver necklace. Site token for the King of Atlantia at Lochmere's Feast of St. Brigit.

Item #32: Six-loop, single-weave silver over six-loop, double-weave blue. Necklace. Auctioned at the fundraiser for Lochmere's new coronets.

#33
Item #33: Six-loop, single-weave blue over six-loop, double-weave gold. Necklace. Added to stockpile of largesse.

Item #34: Six-loop, triple-weave gold necklace woven of 28-gauge wire. Displayed in Atlantia's Kingdom Arts and Sciences Festival 2016.

Item #35: Six-loop, single-weave necklace in alternating blocks of green, silver, and blue. Meant to be worn with Viking apron dress, and items 5 and 6.

Item #36: Six-loop, single weave blue necklace. Given to the Barony of Lochmere as largesse.

Item #37: Six-loop, double-weave blue necklace. Added to stockpile of largesse.

Item #38: Six-loop, single-weave blue necklace. Given to the Barony of Lochmere as largesse.

#37
Item #39: New technique. Six alternating loops of silver and copper. Double-weave necklace. Added to stockpile of largesse.

Item #40: Six-loop, double-weave green necklace. Christmas gift for my future sister-in-law, Jamie.

Item #41: Six-loop, double weave silver necklace with a blue-and-white heart pendant. Christmas gift for my future sister-in-law, Juli.

Item #42: Six-loop, double weave blue necklace for a coworker.

Item #43: Six-loop, double-weave silver necklace with a seahorse zipper-pull pendant. Personal, in memory of a friend who passed away in May 2015.

Item #44: Six-loop, single-weave blue over six-loop, double-weave copper bracelet. Added to stockpile of largesse.

Item #45: Six-loop, single-weave silver necklace. Given to the Barony of Lochmere as largesse.

Item #46: Six-loop, double-weave green necklace. Added to stockpile of largesse.

#49
Item #47: Six-loop, double-weave blue necklace. Intended to bestow as largesse to the Shire of Vaca del Mar at the end of February 2016.

Item #48: Six-loop, double-weave red necklace, made for a Secret Santa gift exchange at work.

Item #49: Six-loop, double-weave gold necklace woven of 28-gauge wire. Christmas gift for my mother.

And, for the grand finale, it seemed only fitting that I combine techniques and create a truly masterful chain for the woman who is my inspiration in the Society ...

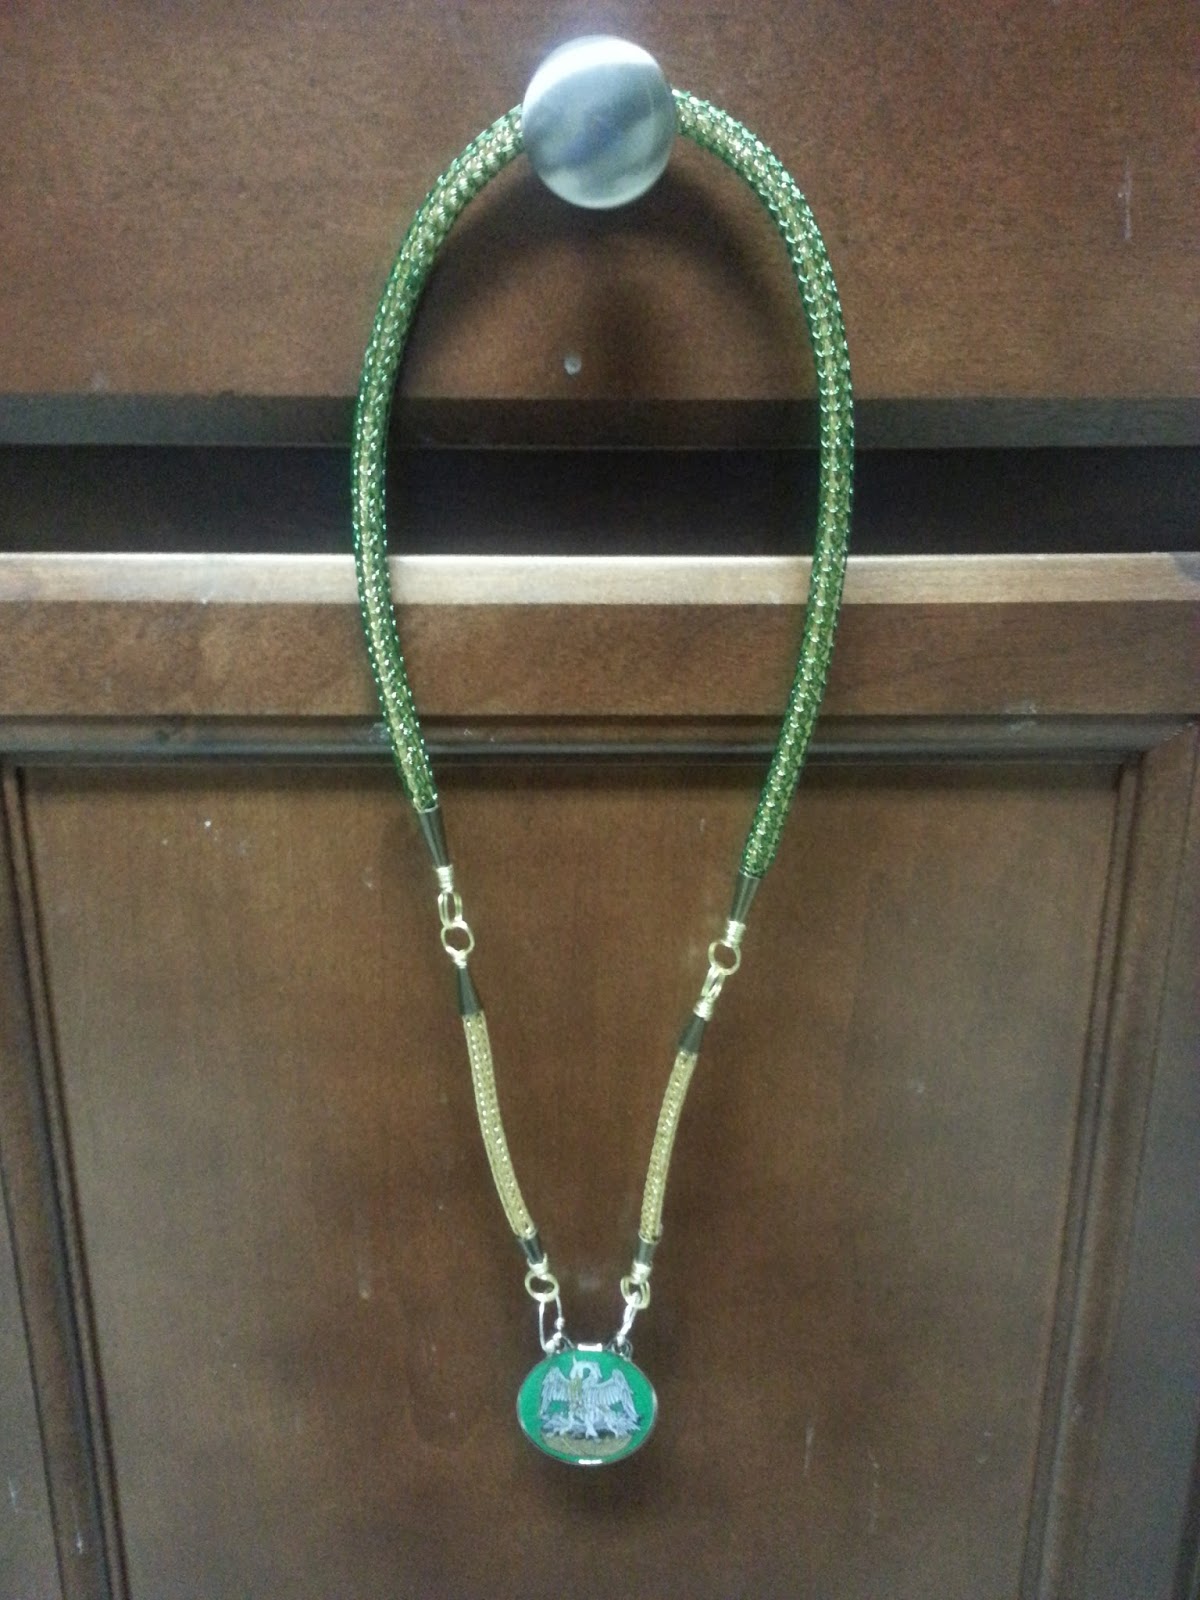
Item #50: Multi-part chain. Six-loop, single-weave green over six-loop, double-weave gold, joined at each end to short chains of six-loop, double-weave gold. Pelican medallion from Combat Medallions. Christmas gift for my Pelican, Mistress Arianna Morgan.


Saturday, April 9, 2016

Leather Award Medallions: Order of the Opal (Atlantia)

My original plan for the A&S 50 Challenge, back when I first learned of it, was to do a set of leather award medallions for the Kingdom of Atlantia. Eventually, I decided to do fifty Viking wire weave chains instead, but now I've decided to tackle the medallions as well.

Her Majesty Thora will be attending Nacht in der Stadt in Lochmere at the end of April, and I decided this would be a great opportunity to present the first set of medallions. I decided to start with the Order of the Opal.

I ordered the leather circles pre-cut from Tandy. They are two and a half inches in diameter. This was simply a matter of convenience--I could have cut circles from the sides of leather I already have, but that would be tedious at best (and likely would have resulted in medallions that were less than perfectly round).

I have a diamond-shaped leather stamp, so the tooling on these medallions turned out to be really easy in that regard. However, keeping the pattern neat and even took some trial and error. For my earliest attempts, I used graph paper to try and space out the diamonds. This resulted in a very busy medallion, more blue than white.

After five or six of these, I changed tactics. I tooled the center diamond, and then used a ruler to mark parallel lines across the circle, lined up with the edges of that central mark. I then lined the stamp up within these lines, spacing it its own width from the last diamond tooled. This was much easier to keep aligned, and resulted in fewer diamonds on the medallion overall.

After the medallions were tooled, I painted them with acrylic paint. The blue only took one coat, but the white took as many as five or six coats to completely and evenly cover the surface.

Once the painting was complete, I allowed the medallions to dry for twenty four hours. Then I dropped them one-by-one into melted beeswax and allowed them to soak for about a minute. I extracted them from the wax and immediately wiped away the excess before placing the medallion on a sheet of parchment paper to cool and harden.

I was pleased to see that after the wax was applied, the texture of the surface of the leather stood out through the paint. This was an unexpected but pleasant surprise.

After the waxed medallions cooled enough to handle them, I drilled the holes for the ring in the top of each one. I used my Dremel tool and a 3/32 bit to drill the holes.

All-in-all, I produced thirteen medallions. Twelve will be presented to Her Majesty at the end of the month. The thirteenth was an "oops"--it must not have been completely dry before I dropped it in the wax!


The rings are made from twenty-gauge, silver-enameled copper wire. The simple style is well-documented in Viking finds.


I am also presenting Her Majesty with twelve fingerloop braid cords in kingdom colors, and twelve Viking wire weave chains. These medallions could be worn suspended from either cord or chain.


Saturday, April 2, 2016

Flacket Gone Wrong

When I agreed to run the Arts and Sciences competition and display at Lochmere's Nacht in der Stadt event, I intended to make the first- and second-place prizes for the Newcomers' Showcase competition. First place would be a leather flacket.

The project started well enough. I had just received a side of lighter-weight 5-6 oz. leather, and I was excited to use it for the flacket. I found a pattern for the shape of the bottle on instructibles.com. It was a bit too squat for my tastes, but that was easily correctable by stretching the image slightly in Paint before printing it.

After tracing the outline of the flacket onto the side of leather, I quickly discovered that thinner leather doesn't necessarily equate to easier-to-cut leather. Oooof! It was no easier at all.

Once I had wrestled it free from the side of leather, I marked the seams and spaced the stitching holes. Then I drilled the stitching holes all the way around. I had also marked the holes for the carrying strap, but I didn't have a drill bit that large. I decided to go ahead and stitch and sand-pack the bottle, and I'd have Dad drill the bigger holes when I saw him next.

For the first time ever, I didn't break a single needle as I stitched the project together! I count that as a major victory. I also hit a point about half-way through the stitching when I got *super* excited about the finished project--it went from this hypothetical concept in my mind to something I could actually visualize as a complete, usable object! I love that point in projects. It's such a neat feeling.

Once it was stitched, I soaked the leather with water and then packed it with sand, stuffing it as full as I could. Then I wedged an old, dried-out highlighter into the neck to hold it in a perfectly round shape as it dried. I let it sit for three days to dry completely.

After it had dried, I took it over to my parents' house to have Dad drill the big holes. It turns out that waiting was a mistake--even though it wasn't yet wax-hardened, the leather was so stiff from having been soaked and dried that it was very difficult to drill through. The drill actually skidded across the leather a bit on the first hole, an imperfection I hoped would be disguised by the waxing and then further hidden when the carrying strap was attached. Next time I know: do ALL the drilling first.

With the holes finally in place, I took the bottle back home and popped it in a warm oven for about twenty minutes. Then I applied hot beeswax to the exterior surfaces. I immediately noticed that the leather didn't turn a deep, rich brown like the thicker leather has in the past. Still, it did darken somewhat, so I attributed it to the different leather weight and kept working.

When I applied the wax to the back, something very strange happened. Most of it matched the front, but there was a spot roughly the diameter of a quarter where the base of the neck began to widen out into the body that turned MUCH darker. I still haven't figured out why that happened, and it looked really strange. Crossing my fingers, I hoped that it would even out when I melted off the excess wax--maybe the additional absorbing of wax would darken the rest of the flacket a bit?

I poured four coats of EnviroTex Lite inside the bottle, taking great care to spread it evenly over all the surfaces and allowing each coat to dry for twenty four hours. I couldn't see the inside very well, though I did my best by shining a flashlight down the neck. The only way to know for sure would be to melt off the excess wax and then fill the bottle with water and check for leaks.

When I filled it with water, I didn't see any leaks or seepage around the seams. This was good. I poured the contents into a measuring cup--the flacket holds about a cup and a half of liquid.  That was a little surprising--I thought it would be at least two cups.

I looked back at the bottle, and was surprised to see light speckles in the finish that hadn't been there before. I immediately jumped to the conclusion that the sealant hadn't completely coated the inside and the water was seeping through the leather in places. Worrisome, but not a disaster--I just had to let the leather dry out, and do another coat of sealant.

I left the bottle standing inverted in a cup for three days before reapplying a thick coat of beeswax along the seams and pouring in another coat of the sealant. I painstakingly tilted the bottle this way and that, doing my very best to ensure that the entire interior was covered. When I was at last convinced that I could do no more, I set it aside to dry.

When I put it back in the oven to again melt off the excess wax the next day, I was pleased to note that the light speckles darkened back down to match the rest of the surface. When it came out of the oven, it looked exactly the way I hoped it would--except for that strange dark spot on the back, which had not blended any better.

I decided I had better let it cool completely before testing it for leaks again, so I set it on a shelf in the living room and left it overnight. The next day, I carefully filled it with water, holding my breath the whole time. No spots appeared! I held it full for several minutes, watching carefully for any sign of seepage. It maintained its perfect finish, and I breathed easier.

When I poured the water out, some of it dribbled down the sides. Immediately, speckles of discoloration began to appear. I stared at it in disbelief and horror. It was thoroughly sealed with wax! What was going on?!

I flipped the faucet on and ran water over the entire exterior surface. And ... well ... it did this:


I don't understand why this happened--I've never seen anything like it. I can only surmise it has something to do with the leather itself, because the wax is the same and all of my techniques are the same as my previous projects.

It has become apparent, though, that I cannot give this flacket as a prize. It's useless for its intended purpose. It's only good as a display item, really. And it's only good for that IF I can bring it back to its pre-water appearance with another coat of wax.

Friday, February 5, 2016

Fingerloop Braid Experiment

Introduction

Fingerloop braiding was one of my very first art forms in the SCA. I learned the technique from Mistress Annora verch Llwyd Bryneirian during an Arts and Sciences meeting in 2004 in the Canton of Bard's Keep, Barony of Western Seas, Caid. Since then, I have obtained the Compleat Anachronist issue on Fingerloop braiding (issue #108) and attended various classes to learn specific patterns.

However, I wanted to continue to learn and grow in this art form. To do this, I decided I need to better understand how each strand in any given pattern moves. I decided to begin with my favorite pattern from the Compleat Anachronist, “A grene dorge of vj bowes.” When followed exactly, this pattern produces a flat cord with one color running down each side and two additional colors alternating down the center.

My first two examples simply eliminate one of the three colors from the pattern, leaving a single color down the middle bordered by a second color on each side. From there, I have rearranged which colors are placed on which fingers to start the weave, which has yielded some interesting—and beautiful—results.

These cords are all made from cotton crochet thread. In period, silk thread was heavily favored for fingerloop lacings. It is suspected that they were also made of linen to be used as ties for linen undergarments, but no known extant samples have been discovered. I have opted for cotton because it is readily available in a variety of colors and fairly inexpensive to acquire. I chose blue and white because these are the Baronial colors for the Barony of Lochmere, and I intend these cords to be a gift of largesse to Their Excellencies after this display.

Cord variations from a single pattern.

How It Was Done

The original instructions for this pattern are set in a manuscript now housed at the British Library, referred to as Harley Maunscript 2320. This manuscript is believed to be from circa 1450. The original text in English as transcribed by E.G. Stanley reads:

A grene dorge of v[j] bowes: Set 4 bowes of o colouur on B, C ry[3]t and B, C
lyft, and o bowe of anoþer colouur on D ry[3]t, and o bowe of anoþer colouur
on A lyft. Þen take wt A ri[3]t þorow B, C ry[3]t þe bowe of C lyft reuerced. þen
lowe þy bowe of B lift vnto C. Þen schal B lyft take þorow C lyft þe bowe C
ry[3]t reuerced. Þen lowe þy ry[3]t bowes. Þen schal A lyft change wt D ry[3]t,
&cra.


The redaction of the instructions by Lois Zwales as presented in the Compleat Anachronist issue reads as follows:

A green dorge of 6 bowes: Set 4 bowes of one color on B, C right and B, C left,
and one bowe of another color on D right, and one bowe of another color on A
left. Then take with A right through B, C right the bowe of C left reversed. Then
low thy bowe of B left onto C. Then shall B left take through C left the bowe C
right reversed. Then low thy right bowes. Then shall A left change with D right,
etc.

This diagram of the pattern, which I have modified from the one on www.fingerloop.org, shows the original pattern. To read the moves, consider that A is your pointer finger, B your middle finger, C your ring finger, and D your pinky. R is right, and L is left. Therefore, AR is your pointer finger on your right hand, and so forth. This version of the diagram is shown with no colors specified; it shows only the movements each bowe and finger makes.


Now, to create the cord with blue running down the center bordered by white, I set the bowes up as follows:

AL and DR: Blue
BCL and BCR: White

Visually, that looks like this:


To create the cord with a white center bordered by blue, I reversed the color setup.


We can see that the bowes on AL and DR are the only two that make up the center stripe of the cord. The other four, then, create the borders. But how, exactly, do they weave together to make those borders?

I began setting the colors up in random starting arrangements, to see what might emerge.

Variation One


This cord is set up as follows:
ABCL Blue
BCDR White


After move three, the colors have not returned to their “home positions” as they did in the previous cord. Also, because AL and DR are not the same color, we do not find a solid stripe running down the center of the cord.

Variation Two


This cord is set up as follows:

ABL and DR: White
CL and BCR: Blue


Once again the colors are not back at home at the end of the first round of moves, but AL and DR are the same color and so we do see the central stripe emerge along the length of the cord.

Variation Three


This cord is set up as follows:

ABL and CDR: White
CL and BR: Blue


Variation Four


This cord is set up as follows:

AL: Blue
BCL and BCDR: White


For this pattern, the lone blue bowe stays in position until Move Three, when it goes to DL. In the following round, it moves back to AL. This creates the alternating white and blue stripe down the middle of the cord, which when bordered by white as well comes out looking like a row of tiny blue hearts. I think, of all the experimental cords from this pattern, this is my favorite variation.


Conclusion and Where to Go Next

By altering not the pattern of the weave itself but rather simply the starting positions of the colors, we can create a variety of beautiful cords. Was this done in Period? Maybe. I'd venture to say probably, because it's practical—one would only have to learn a single set of movements to be able to create several different cords.

To truly understand where each bowe goes at each step of the weave, I think I need to do one more experiment—one in which each bowe is a different color. While I'm sure the final cord of such a setup will not be visually pleasing in the least, it will allow me to see exactly where the bowe from BL is in the second, third, fourth, and future rounds through the three moves.

After that experiment, I will begin the process all over again with another pattern!

Works Cited
Primary Source:

Manuscript Harley 2320, circa 1450. In the British Library, with scans on the web at http://www.bl.uk/manuscripts/Viewer.aspx?ref=harley_ms_2320_f052r.

Secondary Sources:

Swales, Lois, and Zoe Kuhn Williams. "Fingerloop Braids." Compleat Anachronist, no. 108 (July 2000).

Swales, Lois, and Zoe Kuhn Williams. "Fingerloop Braids." Fingerloop Braids. Accessed February 04, 2016. http://www.fingerloop.org/.


verch Llwyd Bryneirian, Annora. "Beginner Fingerloop Braiding." Lecture, A&S Day, Canton of Bard's Keep, 2004.

_____________________________________________________________________________
Entered in:
Kingdom A&S Festival, Atlantia--Lochmere Baronial Display

Saturday, January 23, 2016

A More Period Blackjack

This is my fourth blackjack to date. I have the techniques down fairly well—tracing, cutting, sewing, tooling. How, then, do I continue to challenge myself as a leatherworker?

My goal for this project was to move further from the modern and closer to the medieval. On past projects, I have used overtly modern tools—such as a Dremel tool—and overtly modern finishings—acrylic paint, EnvirotexLite. This project, then, would be completed using an awl to drill the holes (much as my aching hands would come to regret that decision), no tooled and painted designs, and wax to seal the inside. It was the waxing of the interior that had me most nervous—a completely new technique applied late in the project (being the last step before completion) meant the potential for a lot of work wasted, if I got it wrong and ruined the jack.

I also knew that, because there would be no fancy tooled and painted design to draw the eye, the craftsmanship of the vessel itself would have to be its own adornment. Uneven stitching, nicks in the leather, and rough edges would all stand out all the more on this project.

I began by drawing up a measured blueprint of the body of the mug on a piece of waxed parchment paper. I have discovered this to be superior to regular paper, because the wax helps it repel water when it comes time to trace the pattern onto the wet leather, thereby preventing rips and tears in the pattern. The measurements I used were based on a mug I had previously completed, which was assembled from a pattern provided by Lord Geoffrey de Cardeville during an eight-week workshop he taught in the Barony of Lochmere in 2011.

Once the blueprint was drawn up, I wet down a side of ten-ounce, vegetable-tanned cow leather and traced the pattern into it. Then, using an Xacto knife, I cut the body of the blackjack from the side of leather. Since I did not intend to tool any designs into this project, I moved on immediately to the seams. Using a seam marker and a four-hole punch marker, I marked the seams into the leather. Then, using an awl, I bored the sewing holes. This was a long, miserable process, and made me appreciate our modern tools all the more. When the holes were complete, I stitched the jack together using brown waxed linen thread and two needles.

Once the body of the mug was sewn, it was time to measure and cut the bottom insert. This took two attempts to accomplish successfully. On the first attempt, I simply traced around the existing footprint of the body of the mug. This produced a piece that was much too narrow—it wouldn't even stay in place when I tried to sew it in, but if it had, the mug would have been thinner than a modern beer bottle! So I tried again, with a wider piece. It still resulted in a narrower mug than I would have preferred, but it was much better than the first try.

To sew the bottom into the mug, I bored stitching holes into the bottom piece of leather by matching them up to the already-bored holes in the body. These were done five holes at a time, then stitched before drilling the next five. As I have learned in previous projects, the bottom leather piece stretches and moves as it is sewn, so pre-drilling all the holes does not work out very well—they wind up not lining up correctly with the holes in the body.

Once the bottom was sewn in, I soaked the blackjack in cool water for around five minutes. Then I filled the mug with sand. Using a mallet and a dowel rod, I pounded the sand down in tightly. Then I added more sand, and repeated the process. This stretched the leather and created the mug's uniform, round shape. Once it was thoroughly packed, I set it aside to dry out for four days.When it was dry, I poured the sand out of the mug.

Now came the new and exciting part of the process: the waxing. On my previous projects, I have sealed the outside of my vessels with wax and the inside with a completely modern epoxy called EnvirotexLite. For this project, however, I wanted to take a more period approach, and so I intended to seal the entire jack with wax.

In consulting with other leatherworkers, I learned that the best way to go about this is to heat the leather at two hundred degrees Fahrenheit for several minutes (preheating the leather causes it to absorb the wax better) and then submerge it completely in liquid wax. Then, it should be left submerged until no more air bubbles escape the leather. After it is removed from the wax, it should again be heated to melt away any thick, excess wax on the exterior surfaces.

I ran into a problem almost immediately with this plan, however, because the crockpot I use to melt my wax is entirely too small to fully submerge a project this size. So I improvised. After warming the mug in my oven, I submerged the lower half of it in the crockpot of melted wax. Using a ladle, I then poured wax into it while it was still submerged. Then I used a pastry brush to apply wax to the outside surface of the mug. At no time did I observe any air bubbles using this method, so I had to guesstimate how long it should sit to allow the wax to thoroughly penetrate the leather. I then removed the jack from the crockpot, poured out the wax, and placed it upside-down in a pan in my oven for about fifteen minutes to melt off the excess.

When it came out of the oven, I allowed it to cool briefly—not to room temperature, but enough so that fresh wax applied to it would solidify quickly. Then, using my pastry brush, I carefully applied wax to the interior seams of the blackjack.After that, I allowed the blackjack to cool completely to room temperature. I then filled it with water and set it on a piece of newspaper, keeping an eye out for wet spots that would indicate leaks. Only one such spot appeared—water was escaping through two of the stitching holes in the bottom of the mug. I applied more wax over these holes on the exterior of the mug, and then filled it with water again. This time, no leaks appeared.

This finished mug holds twenty ounces. Because it is sealed with wax, it cannot be used for hot beverages.


______________________________________________________________________
Entered In:
Kingdom Arts and Sciences Festival 2016, Atlantia: Barony of Lochmere's Baronial Display

KASF display. (c) Lady Cassair Warwick

Monday, January 11, 2016

An Experiment: Wire-Wrapped Rings

In my never-ending quest to come up with largesse ideas for my 50 States of the SCA quest, I came across wire-wrapped rings. I didn't think it was a skill I'd be particularly adept at, but I since I have a stockpile of beads and wire, I figured I'd give it a whirl.

A friend referred me to this tutorial when I asked where she had learned to make these rings. It sounded simple enough, so I retrieved the supplies I would need and set to work. For the mandrel around which I bent the wire band, I used a thick highlighter marker.

My first few attempts weren't stellar, but I had read that it takes a few tries to get the hang of it. For the first ring, I used a lampwork bead I had received as a token at Atlantia's KASF event several years ago. It came out ... well, not ring-shaped. Unhappy with it, I snipped the wire and recovered the bead.

For my second attempt, I used 26-gauge wire instead of 20-gauge (because I have a TON of 26-gauge wire on hand). This was not a good decision--the wire was simply too thin. A ring made of it wouldn't stand up to much wear and tear at all without bending and probably breaking.

On my third attempt, I began to get the hang of it. I again used a lampwork bead and returned to the 20-gauge wire. You can see in the photo that, while the wrapping is a bit uneven, it definitely is recognizable as a ring! The lampwork bead is obviously too large, however. Ideally, your bead should be only 1 cm - 1.5 cm in width and only .5 cm or so thick.

From then on, I was hooked. In two days, I have made more than thirty rings. They work up really quickly--most of them take less than ten minutes from start until finish!

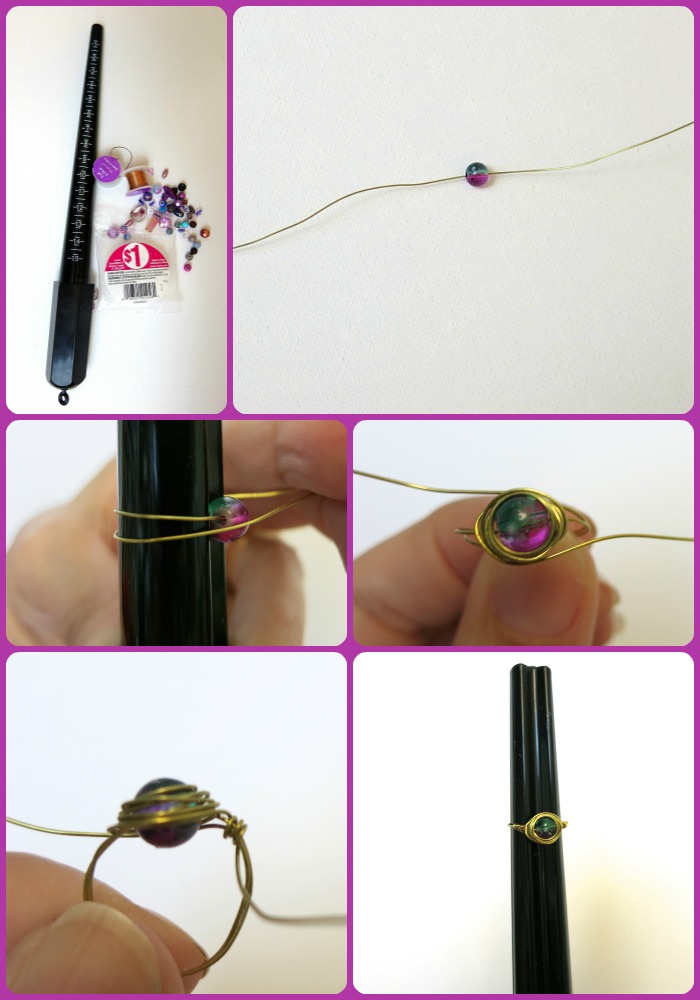
Here are the steps I follow when I create my rings:

Photo tutorial is from Dollar Store Crafts.
The tutorial says to work with a twelve-inch length of wire. I have found that to be far too long -- most of my rings are made with eight inches or so of 20-gauge enameled copper wire. The wire I work with is dead soft. You can work with wire up to half-hard for this type of project, but I prefer the flexibility.

To create your ring, feed the bead halfway along the wire, so that it is in the center. Holding it against your mandrel, wrap each side of the wire all the way around until it reaches back to the the bead *on the side it started on*. That's right, pass under the bead and keep going until you get to the far side. This is how you create an actual, round ring (instead of the shape I wound up with in my first attempt)!

From here, your creativity takes over. Wrap the bead in any way you think looks lovely. Be sure to end your wrap with the loose ends of wire at each side of the bead, and leave yourself enough length to wrap the ends around the band at least twice. This finishes off your ring. Voila! It's complete.

I have discovered that it is best to allow the wire to guide you in its design around the bead, rather than trying to force it where you think it should go. Also be aware that your wire will become stiffer and more brittle the more you work it--this is called "work hardening."

This one is my favorite of the rings I have made thus far. It's made of a green seashell bead and 20-gauge gold-enameled copper wire. Sadly, I don't think I could intentionally duplicate it if I tried. That's the downside of letting the wire guide you.

And these nine round out my "Top Ten" favorites of the rings I have made so far!


Wednesday, December 30, 2015

Second Escallop Flacket

While my first attempt at an escallop flacket was drying, I tracked down a more symmetrical escallop pattern and printed it out. Then I traced it onto ten-ounce, vegetable-tanned leather and cut it out with an Xacto knife. For the record, escalloped symmetrical shapes are just as frustrating to cut out as non-symmetrical ones!

Once it was cut out, I flipped it over and traced it onto the side of leather. Cutting that out as well created a mirror-image piece to be the back of the flacket.

Then I tooled the details into the front piece with a beveled hand stamp and a wooden mallet. As with the first flacket, I left the back unadorned.

When I was done with the tooling, I marked the seams on the front piece (in the photo to the left, you can see the gouges from the seam marker following the contours of the shell design). Holding the front and back together, I drilled the stitching holes along the marked seams. I had to eyeball the spacing of the holes because the tool I use to mark straight seams just doesn't work in tight, curved patterns.

Then, using waxed linen thread, I stitched the seams all the way around the flacket. Like the experimental project, this flacket has a relatively small opening. This again made it very tedious to sand-pack the flacket. I persevered, though. When I could stuff no more sand inside, I wedged a Sharpie marker in the opening to hold it open and round set it aside to dry.

Three days later, I poured the sand out of it. I stuck a thin pen inside the hole and scraped and banged it around inside as best I could to loosen any particles that were still clinging to the leather.

Next, it was time to apply the outside coating of wax. I warmed the oven and turned on the crock pot full of beeswax.  I put the flacket in the oven to warm the leather while I waited for the wax to melt. Then, using a pastry brush, I applied wax to the entire exterior of the flacket. After letting it cool back down to room temperature, I applied an additional thick coating of wax along the seams and edges to prevent the inner sealant from seeping out when it came time to pour.

When the wax had completely cooled, I mixed up about a quarter cup of Envirotex Lite and carefully poured it into the flacket. I tilted and tipped it around for a good twenty minutes, trying to ensure that the inside was completely coated. The extra wax along the edges and seams did the trick--no seepage occurred! Then I up-ended the flacket over a piece of scrap cardboard and allowed most of the excess to drip out. When that was done, I set it aside for twenty four hours to dry.

When it had dried, I poured in the second coat of sealant, which was also allowed to dry for twenty four hours. Then a third coat was applied. When that coat had dried, I heated the oven to 200 degrees and placed the flacket inside to melt off the excess wax. When the wax was liquefied, I pulled the flacket out of the oven and used a paper towel to wipe the last stubborn bits of wax from its surface. I noticed that there were places where I hadn't been careful enough in the application of the wax, and I had gotten it in areas where it wound up under the coat of sealant. This is problematic because it causes the sealant to not bond correctly with the leather, and it leads to chipping.

After allowing the flacket to cool back to room temperature, I filled the it with water and set it aside for several minutes. I then inspected it for any sign of water seepage. Finding none, I poured the water out (despite the size difference, it also holds 1/3c). It was done!


First on the left, second on the right.